SparkLumina Feature Guide
Complete guide to room creation, joining, room features, whiteboard tools, BrushGenius, DeepExplainar, Xchat, and LLM & TTS configuration.
Below are SparkLumina feature screenshots.
Table of Contents
- 1. Create Room
- 2. Join Room
- 3. Room Features
- 4. Whiteboard Tools
- 5. Application Features
- 6. LLM & TTS Configuration
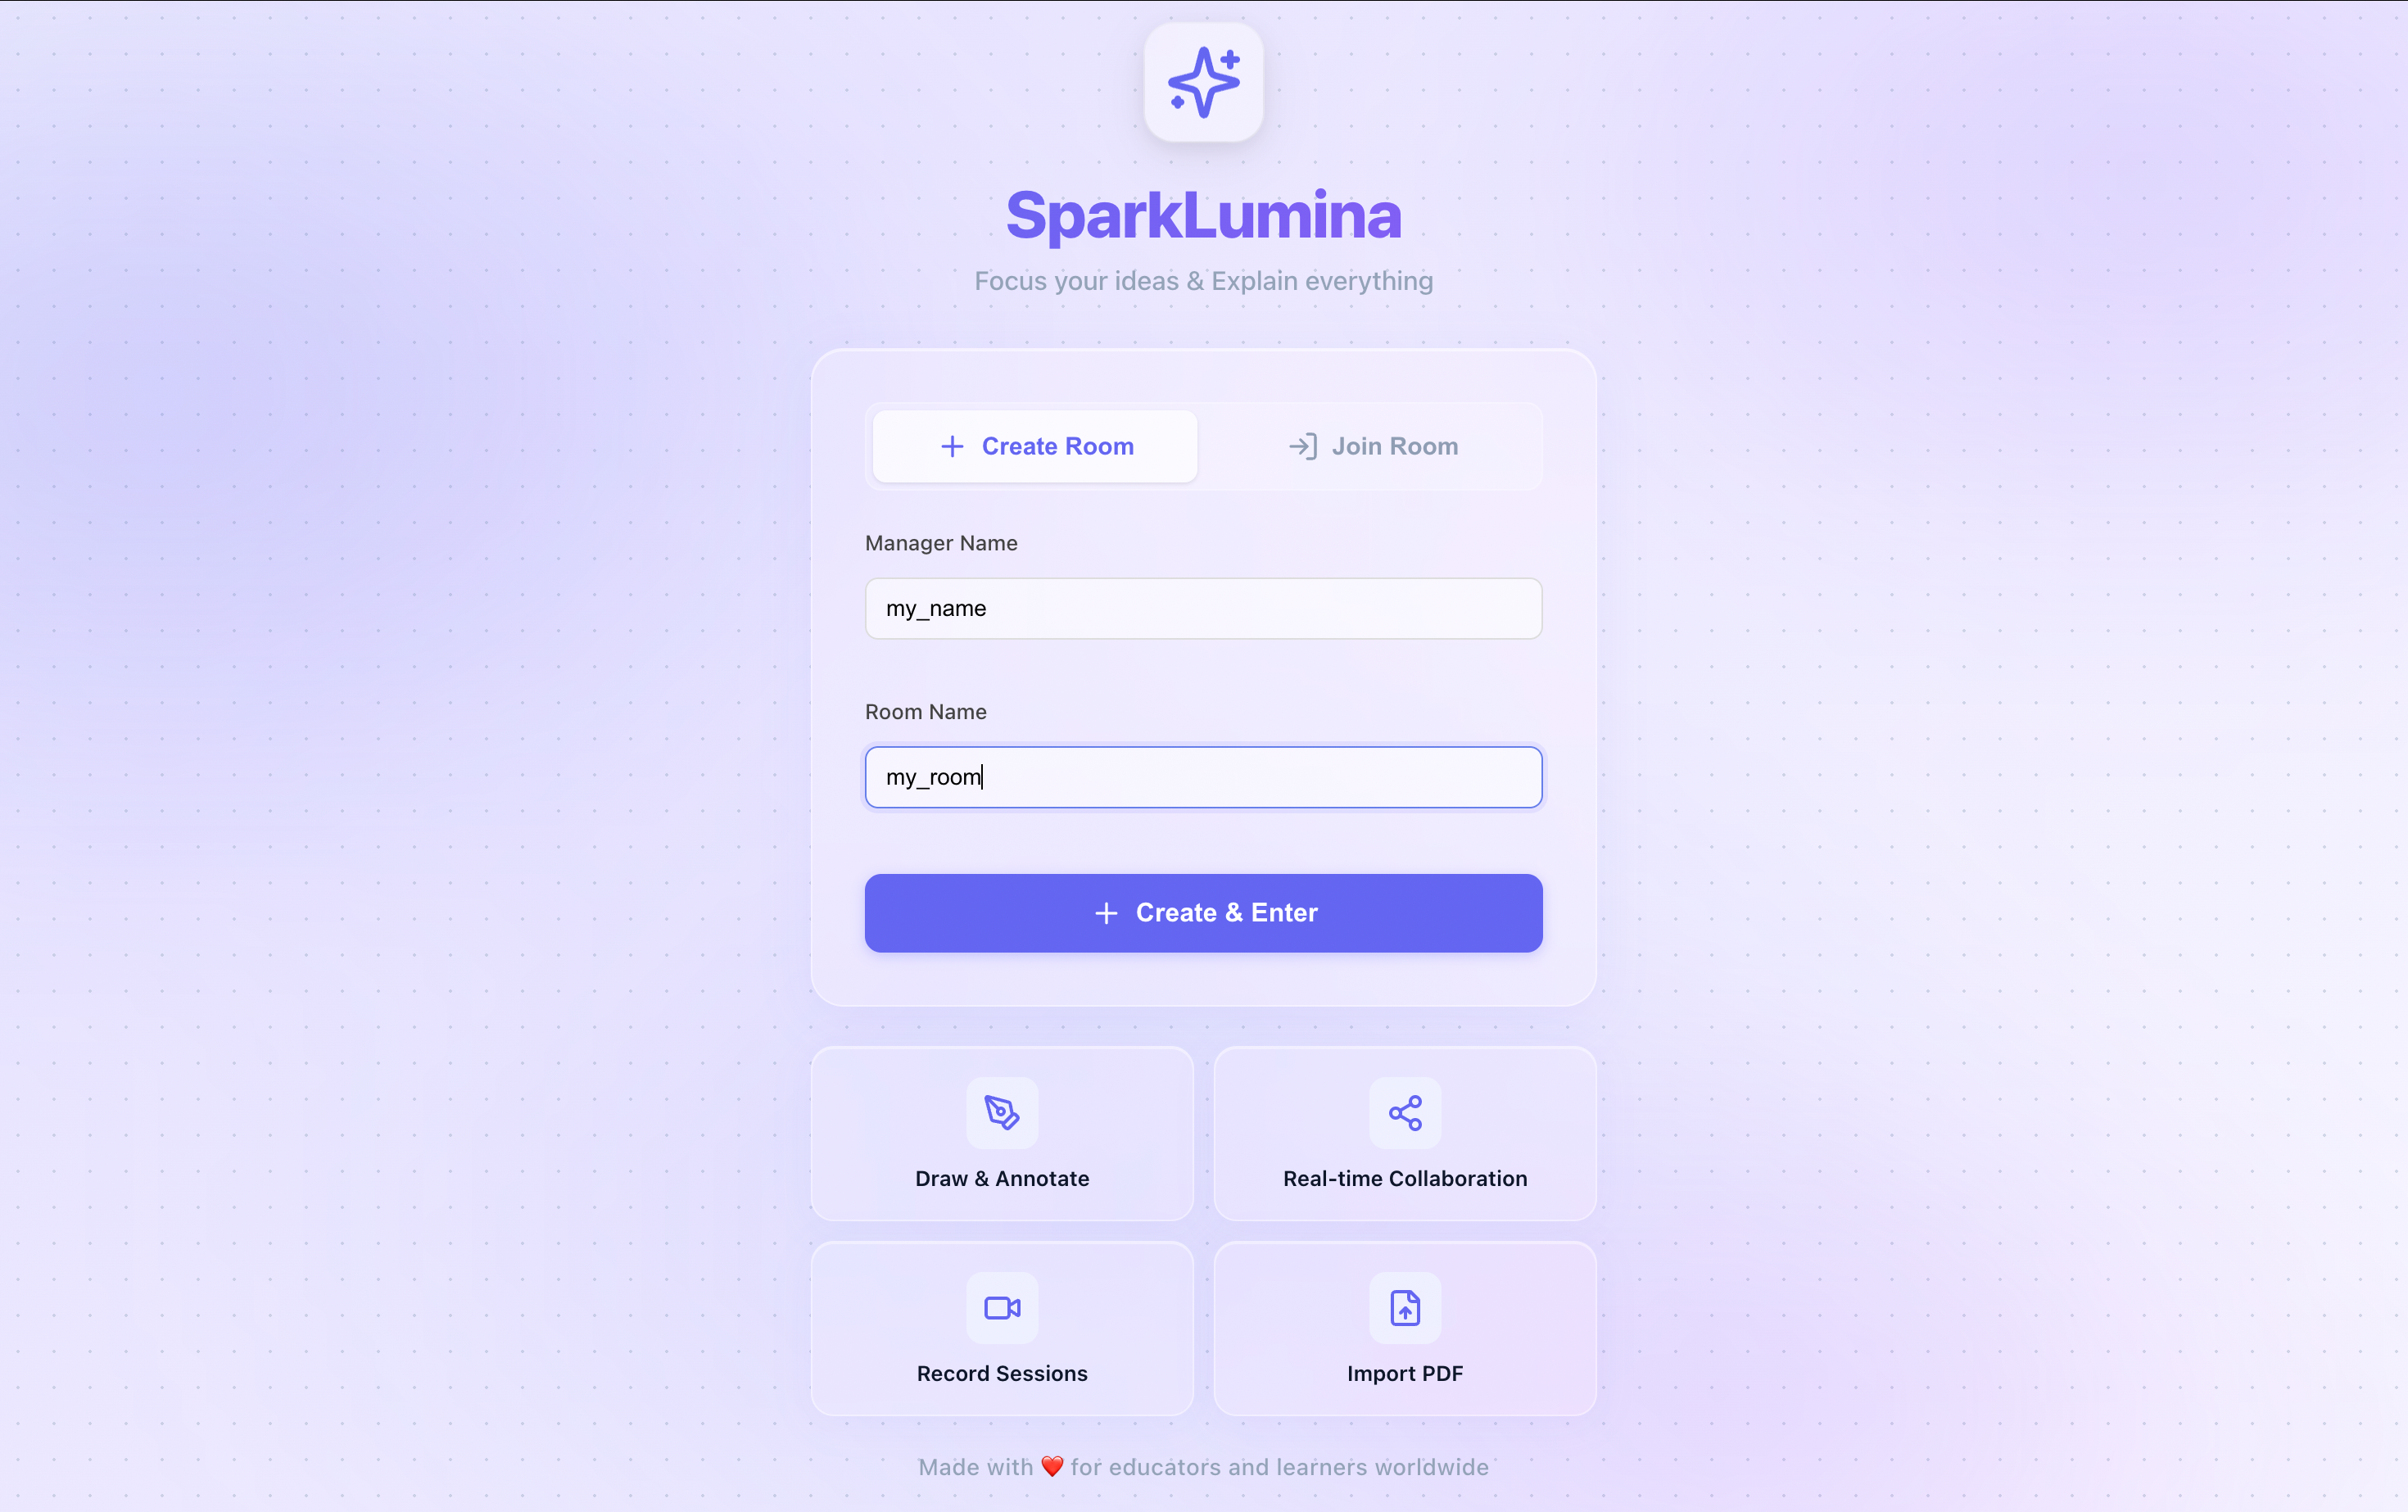
1. Create Room
On the homepage, select the Create Room tab, fill in Manager Name (admin nickname) and Room Name (room display name), then click Create & Enter to create and enter a new room.
- Manager Name is cached locally and auto-filled on next visit.
- Room Name is for display only, not used as join credentials.
- A unique 10-character Room ID is generated for inviting others.
- The creator automatically gets Manager role with permissions to delete the room, transfer Manager, etc.
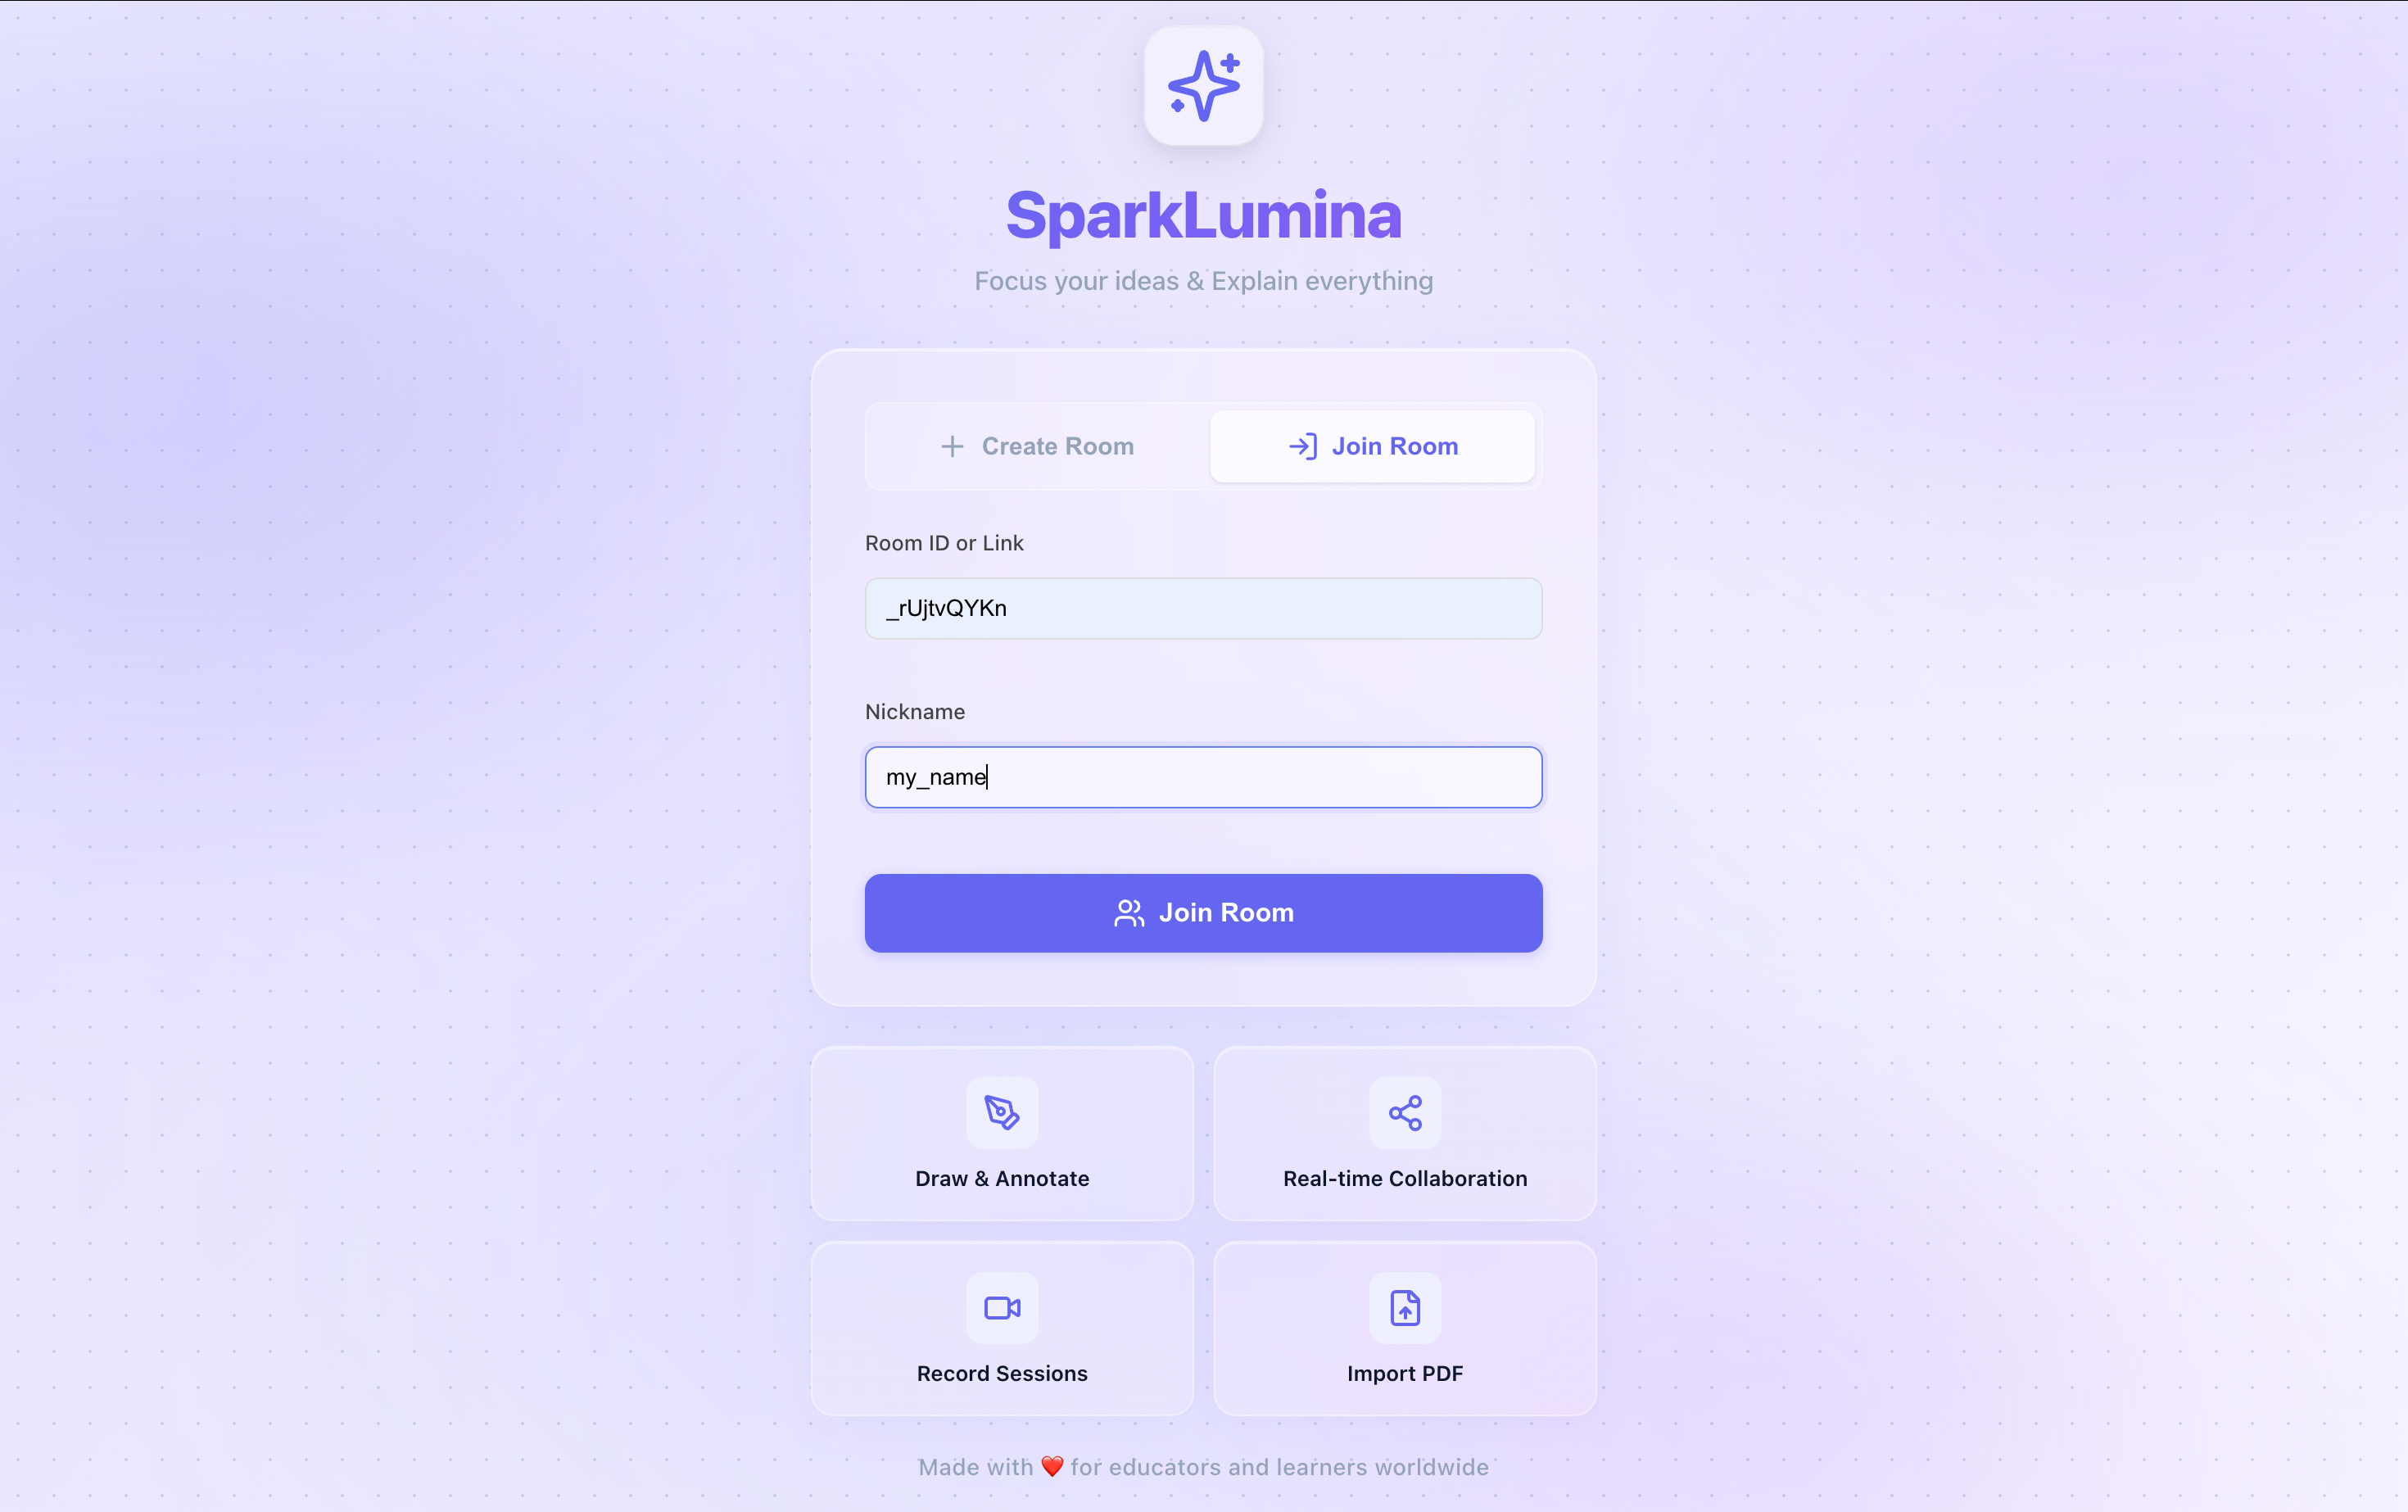
2. Join Room
On the homepage, switch to the Join Room tab, enter Room ID or Link (supports plain Room ID or full invite link) and Nickname (any name), then click Join Room.
- Full share links are supported; the system auto-extracts the Room ID.
- Visiting
/room/:idvia invite link redirects to a quick-join page where you only need to enter a nickname. - Room existence is validated before joining; a clear message is shown if the room does not exist.
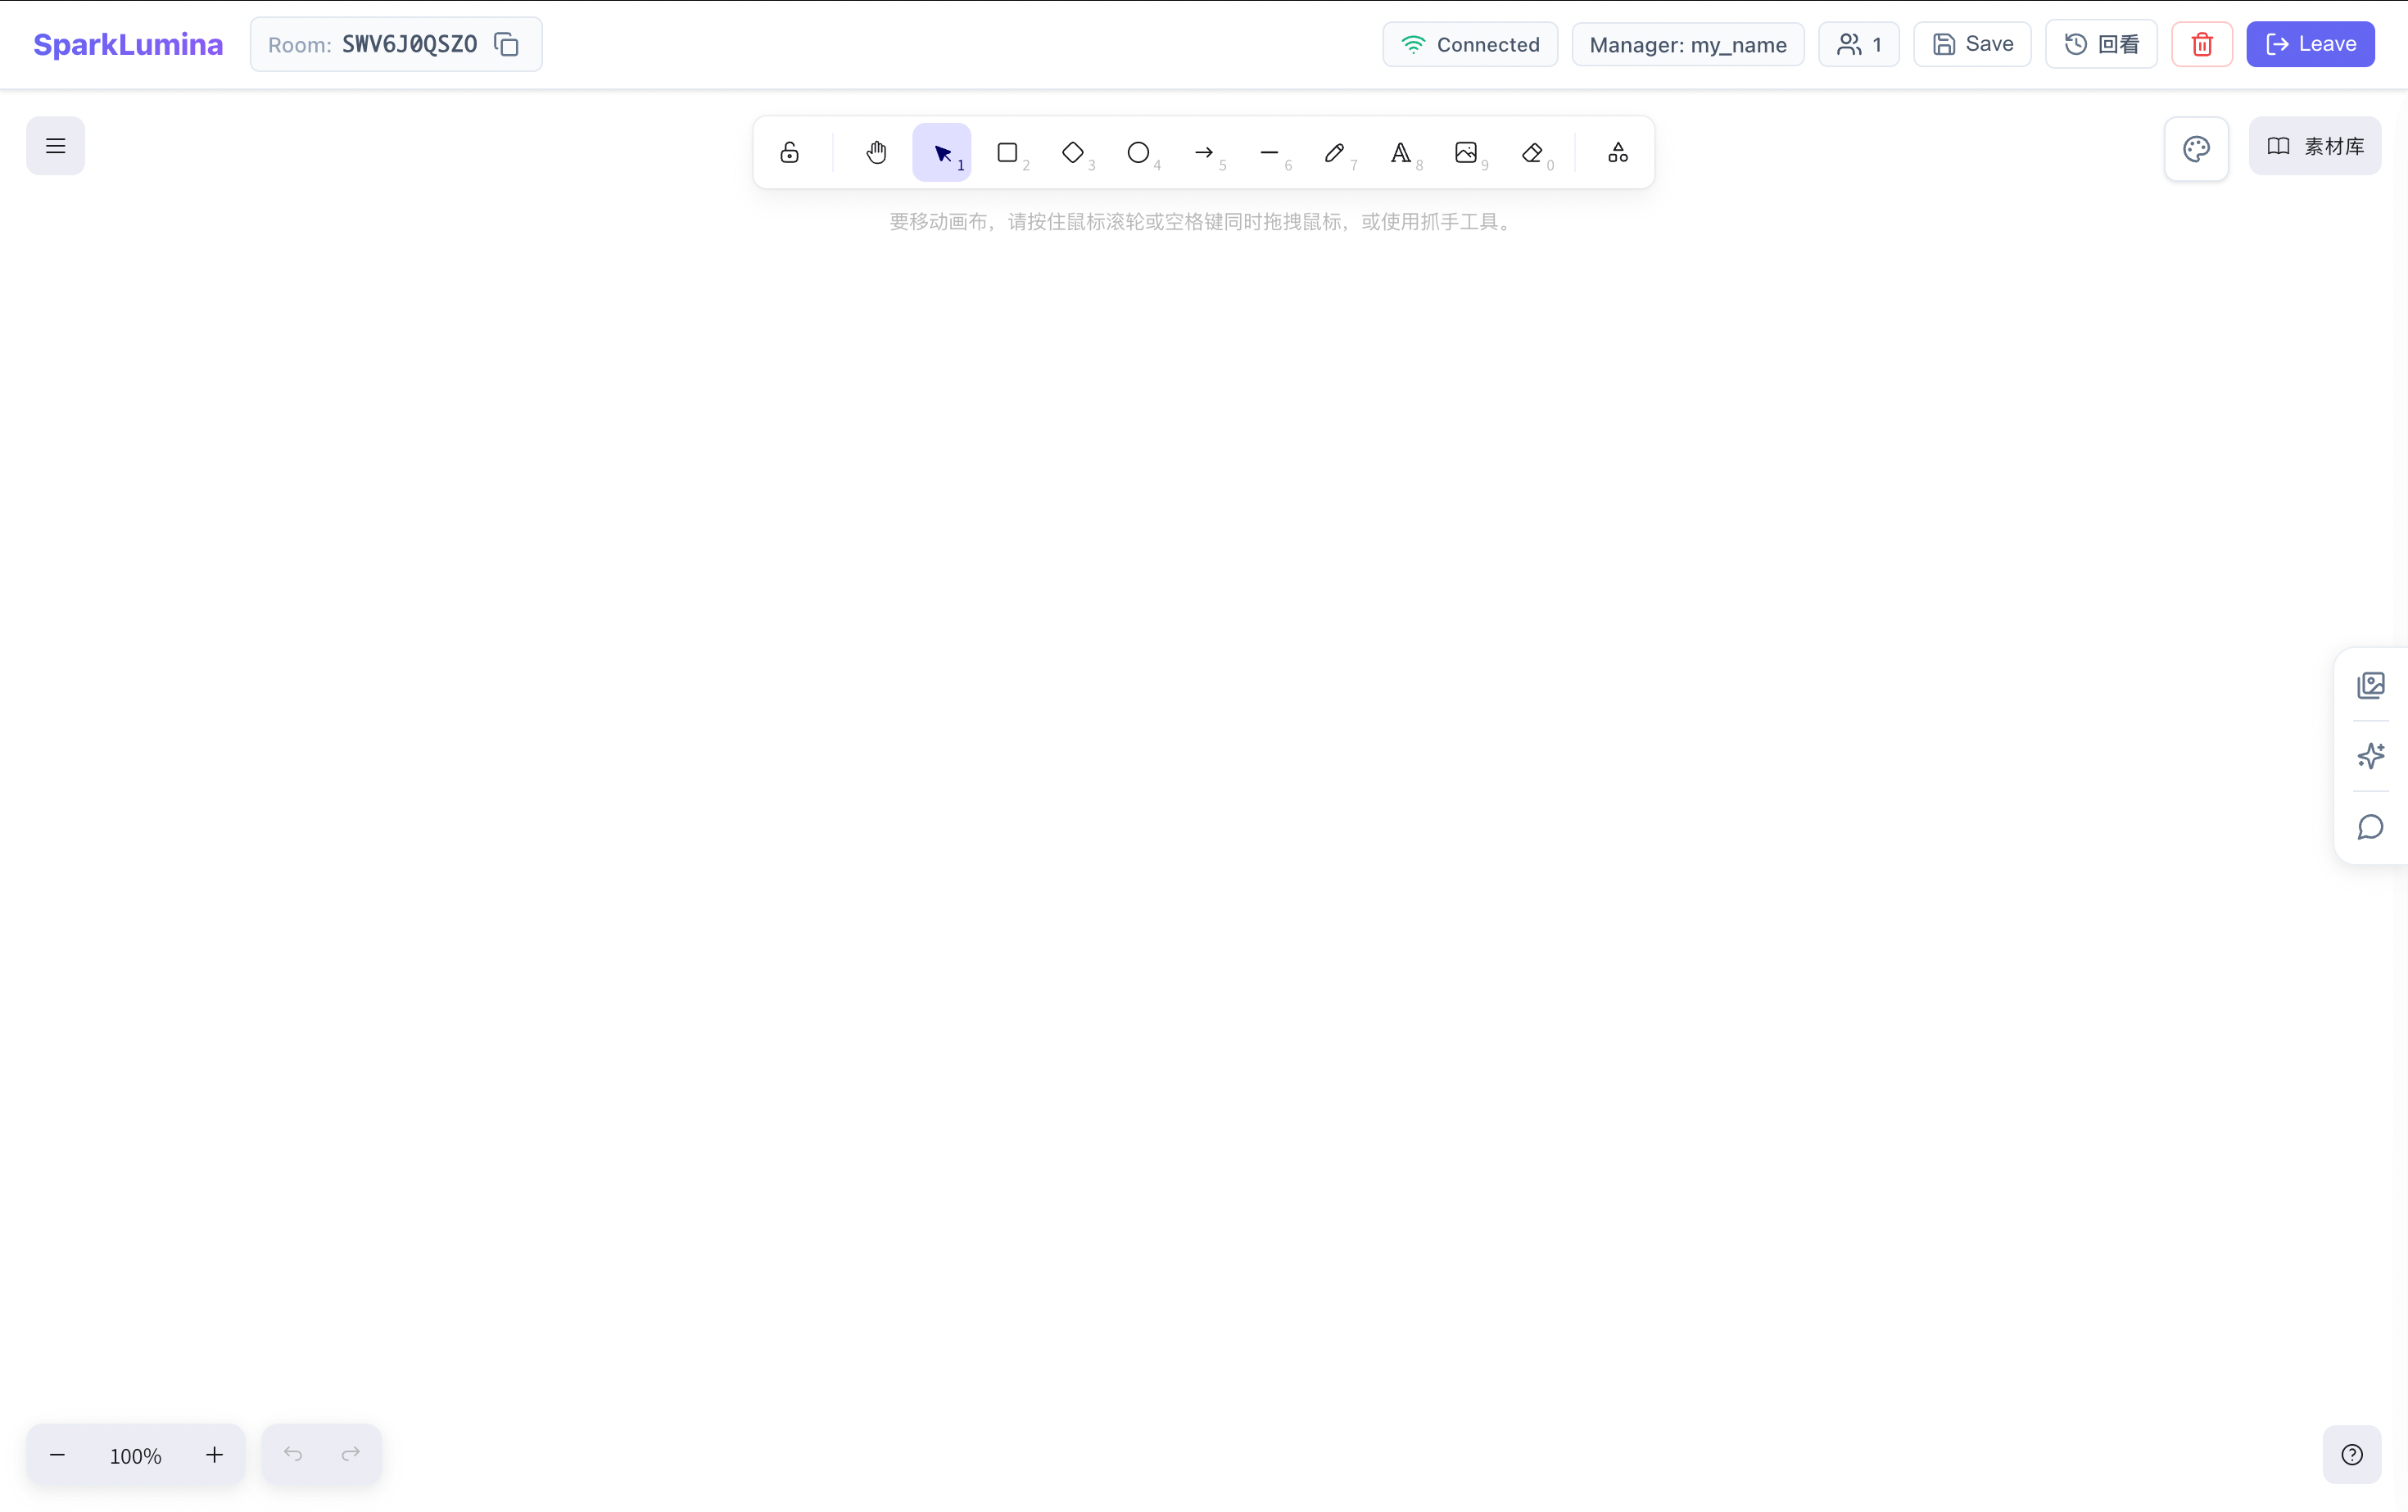
3. Room Features
After entering a room, the top navigation bar provides core room management actions.
3.1 Real-time Collaboration
Multiple users can join the same room and collaborate on the shared whiteboard.
- All canvas changes sync to all members in real time, with latency 100ms.
- The top user avatar area (👥 icon + count) shows online members; hover to expand the list and see Manager vs regular members.
- Each user has a distinct avatar color.
- Auto-reconnect: after network loss, the client retries and restores the latest room state on reconnect.

3.2 Room Status
The top status indicator reflects the current connection:
| Status | Icon | Description |
|---|---|---|
| Connected | 📶 Green WiFi | Connected, syncing normally |
| Connecting | 🔵 Animated dot | Connecting or reconnecting |
| Disconnected | ⚪ Gray circle | Disconnected, operations paused |
Local edits during disconnection are synced automatically after reconnect.

3.3 Save State
Click the top Save button to persist the current whiteboard snapshot to the server.
- While saving: button shows spinner +
Saving.... - After save: button shows ✔
Saved!, then reverts. - Canvas content is retained after everyone leaves; the server does not auto-clear. Re-enter with the same Room ID to restore.

3.4 Video Replay
Click the top 回看 (Replay) button to open the list of historical recordings for this room.
- Lists all MP4 recordings saved in this room via BrushGenius / DeepExplainar / Xchat.
- Click an entry to preview and play.
- Recordings are bound to Room ID; different rooms have separate recordings.

3.5 Delete Room
The 🗑️ (red) button on the top right is visible only to Manager. Click to open a confirmation dialog; confirm to permanently delete the room and all its content.
- Deletion cannot be undone; use with care.
- Regular members do not see this button.

3.6 Leave Room
Click the top Leave button to exit the room and return to the homepage.
- Regular members: Leave directly; room and others are unaffected.
- Manager with other members present: Must transfer Manager to another member before leaving to avoid losing room ownership.
- Canvas content is preserved; re-enter with the same Room ID to restore.

3.7 Share Room
Click the 📋 copy button next to the Room ID to copy the invite link (or Room ID) to the clipboard.
- Icon changes to ✔ after copy to indicate success.
- Recipients can paste the link or ID in Join Room on the homepage.
- In App (Capacitor), only the Room ID is copied; in browser, the full link is copied.

4. Whiteboard Tools
The whiteboard is built on the Excalidraw engine with an infinite canvas and rich drawing tools.
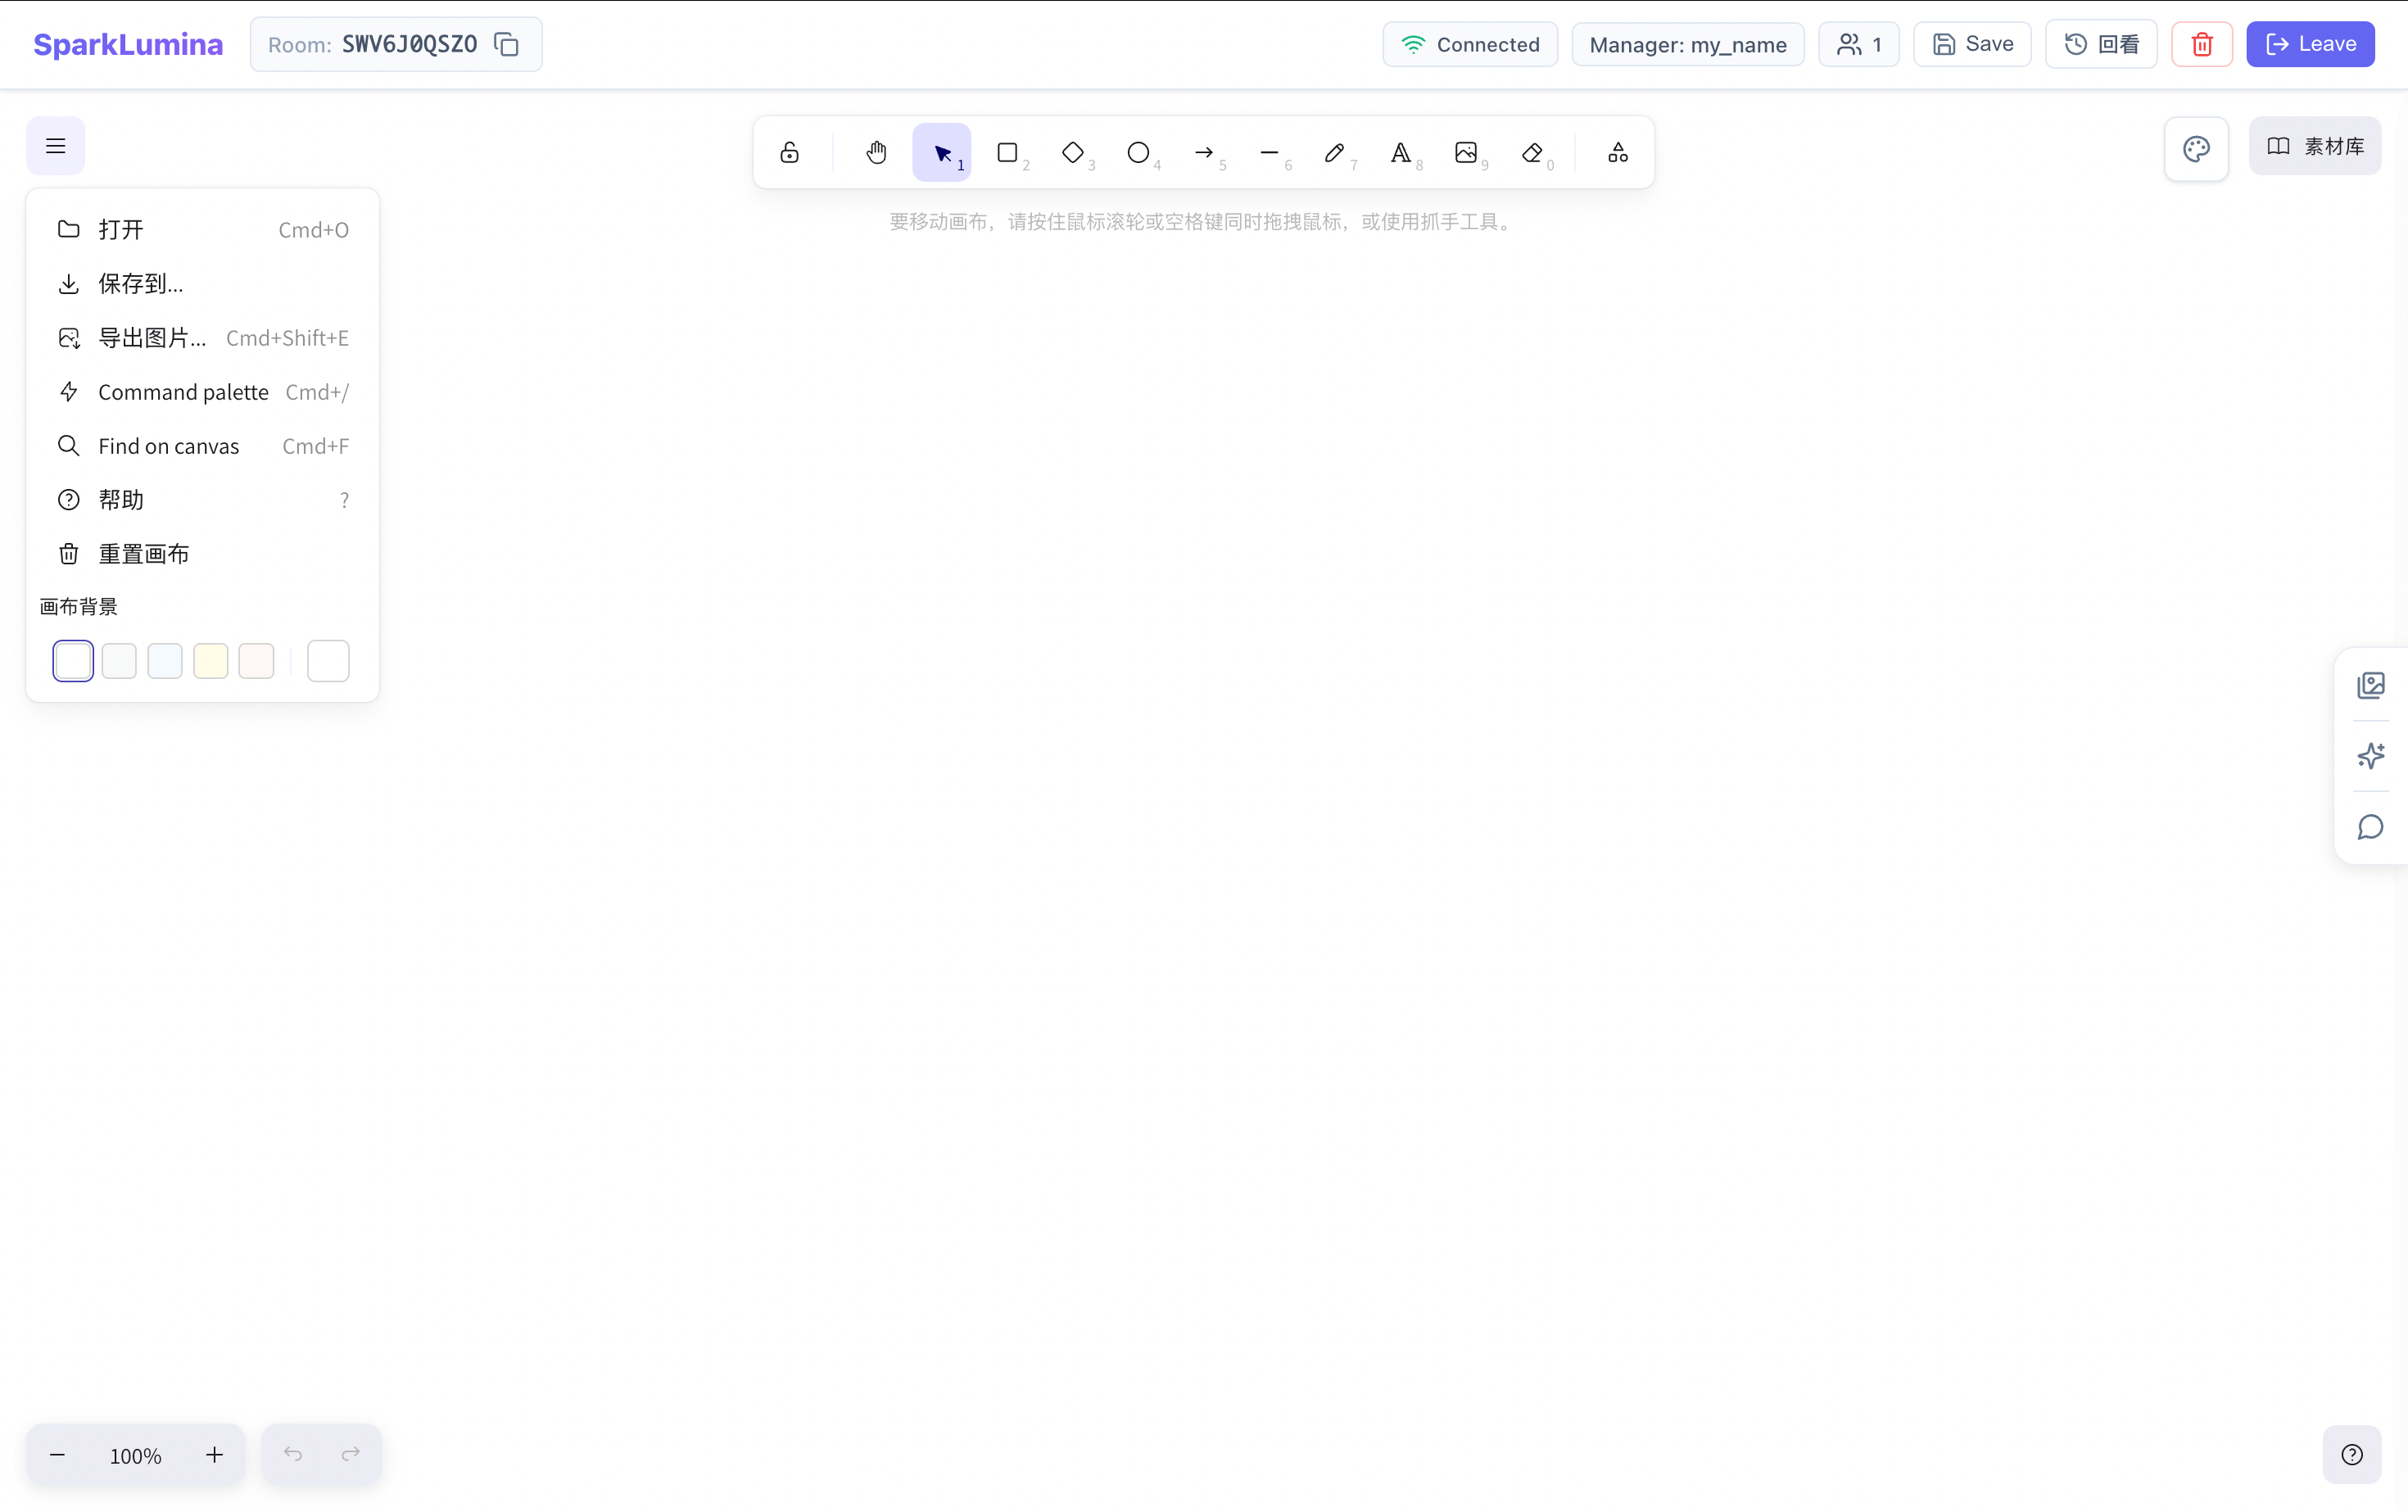
4.1 Whiteboard Menu
Click the ☰ (hamburger menu) in the top-left to open the main menu:
| Menu Item | Description |
|---|---|
| Load Scene | Load .excalidraw scene from local file |
| Export | Export canvas as PNG / SVG / Excalidraw |
| Save as Image | Quick save canvas as image |
| Command Palette | Run any action quickly |
| Search | Search text on the canvas |
| Clear Canvas | Clear all canvas content |
| Toggle Theme | Switch light / dark theme |
| Change Canvas Background | Change canvas background color |
4.2 Toolbar
The top toolbar provides the full drawing toolset:
| Tool | Description |
|---|---|
| 🔒 Lock | Lock tool (stay on current tool after drawing) |
| 🖐️ Hand | Pan canvas (same as Space + drag) |
| ↖️ Select | Select, move, resize, rotate; Shift+click for multi-select |
| ▢ Rectangle | Draw rectangle |
| ◇ Diamond | Draw diamond |
| ⭕ Ellipse | Draw ellipse / circle |
| → Arrow | Draw arrowed line, bind to shape endpoints |
| — Line | Draw line without arrow |
| ✏️ Pen | Freehand drawing |
| A Text | Insert text box |
| 🖼️ Image | Insert local image |
| 🧹 Eraser | Erase strokes or delete elements |
| ⬡ Frame | Create Frame to group and name canvas regions |
Object actions (when selected):
Shift + click— Multi-select- Group / Ungroup (right-click or shortcut)
- Layer order: Bring forward / Send backward
- Copy / Paste / Delete

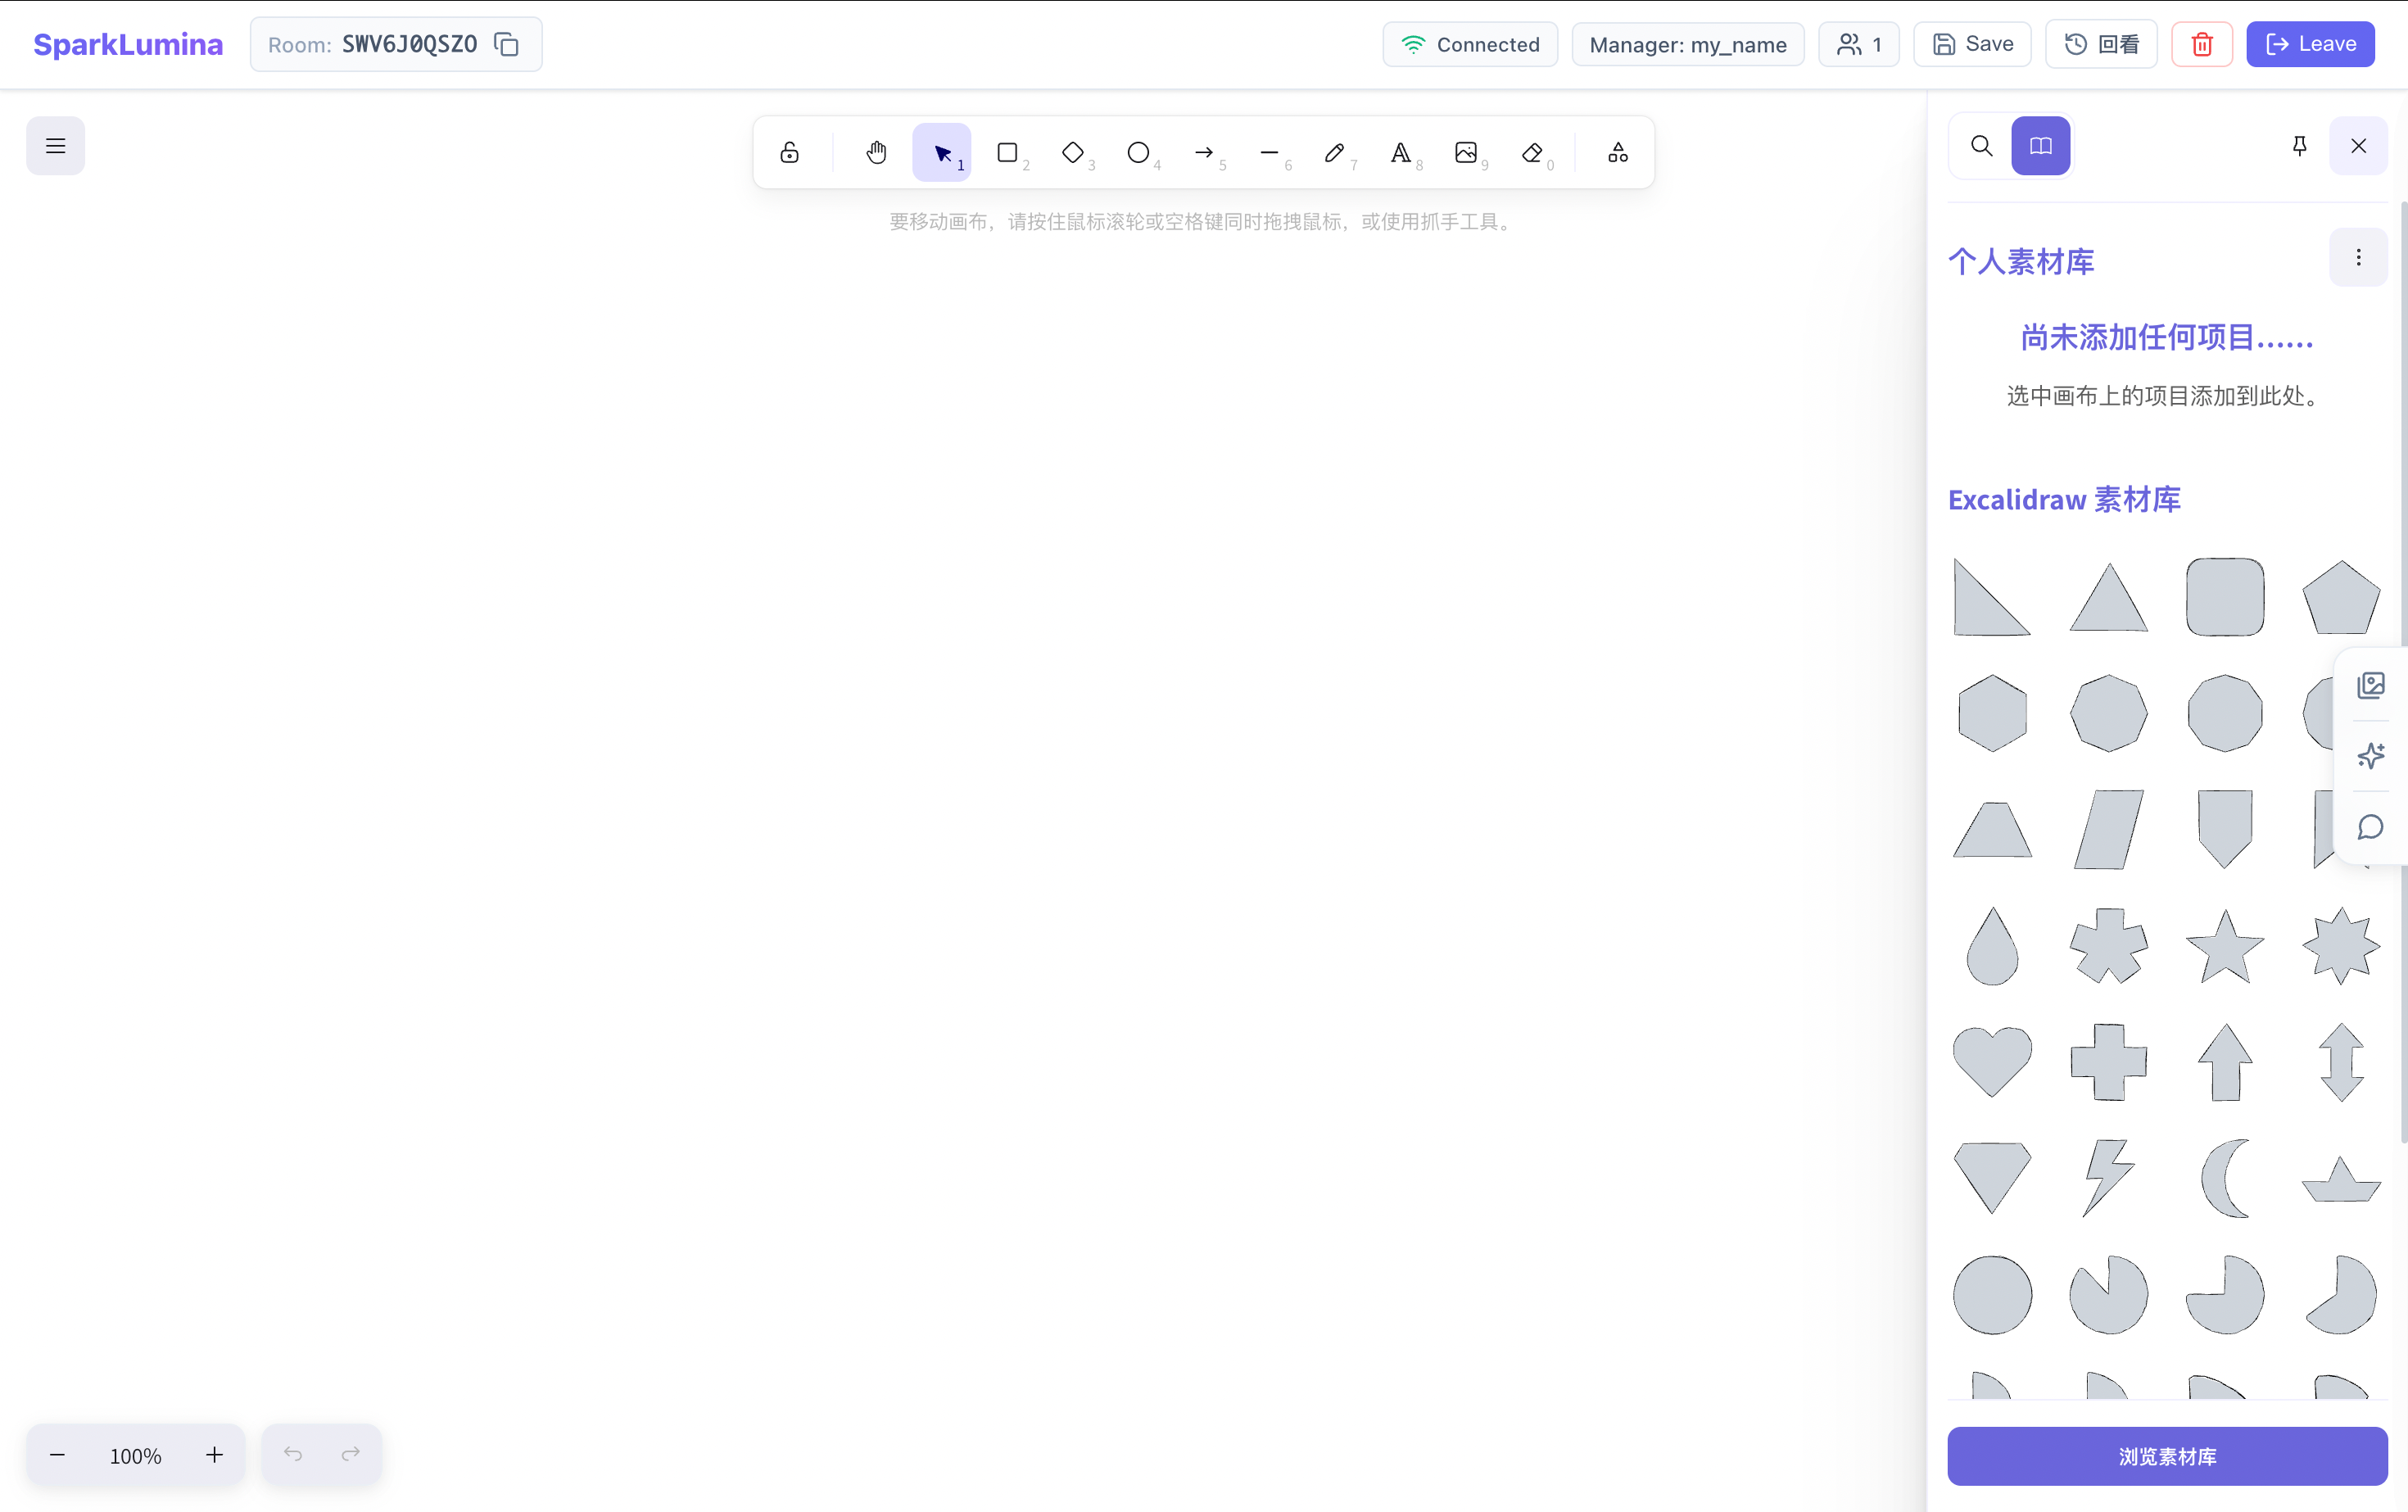
4.3 Library
The Excalidraw library is on the right side of the toolbar; click to open the side panel.
- Built-in shapes, bubbles, flowchart elements, etc.
- Click to insert, drag to place.
- AI Agent (Xchat / BrushGenius) can use library shapes when generating content.
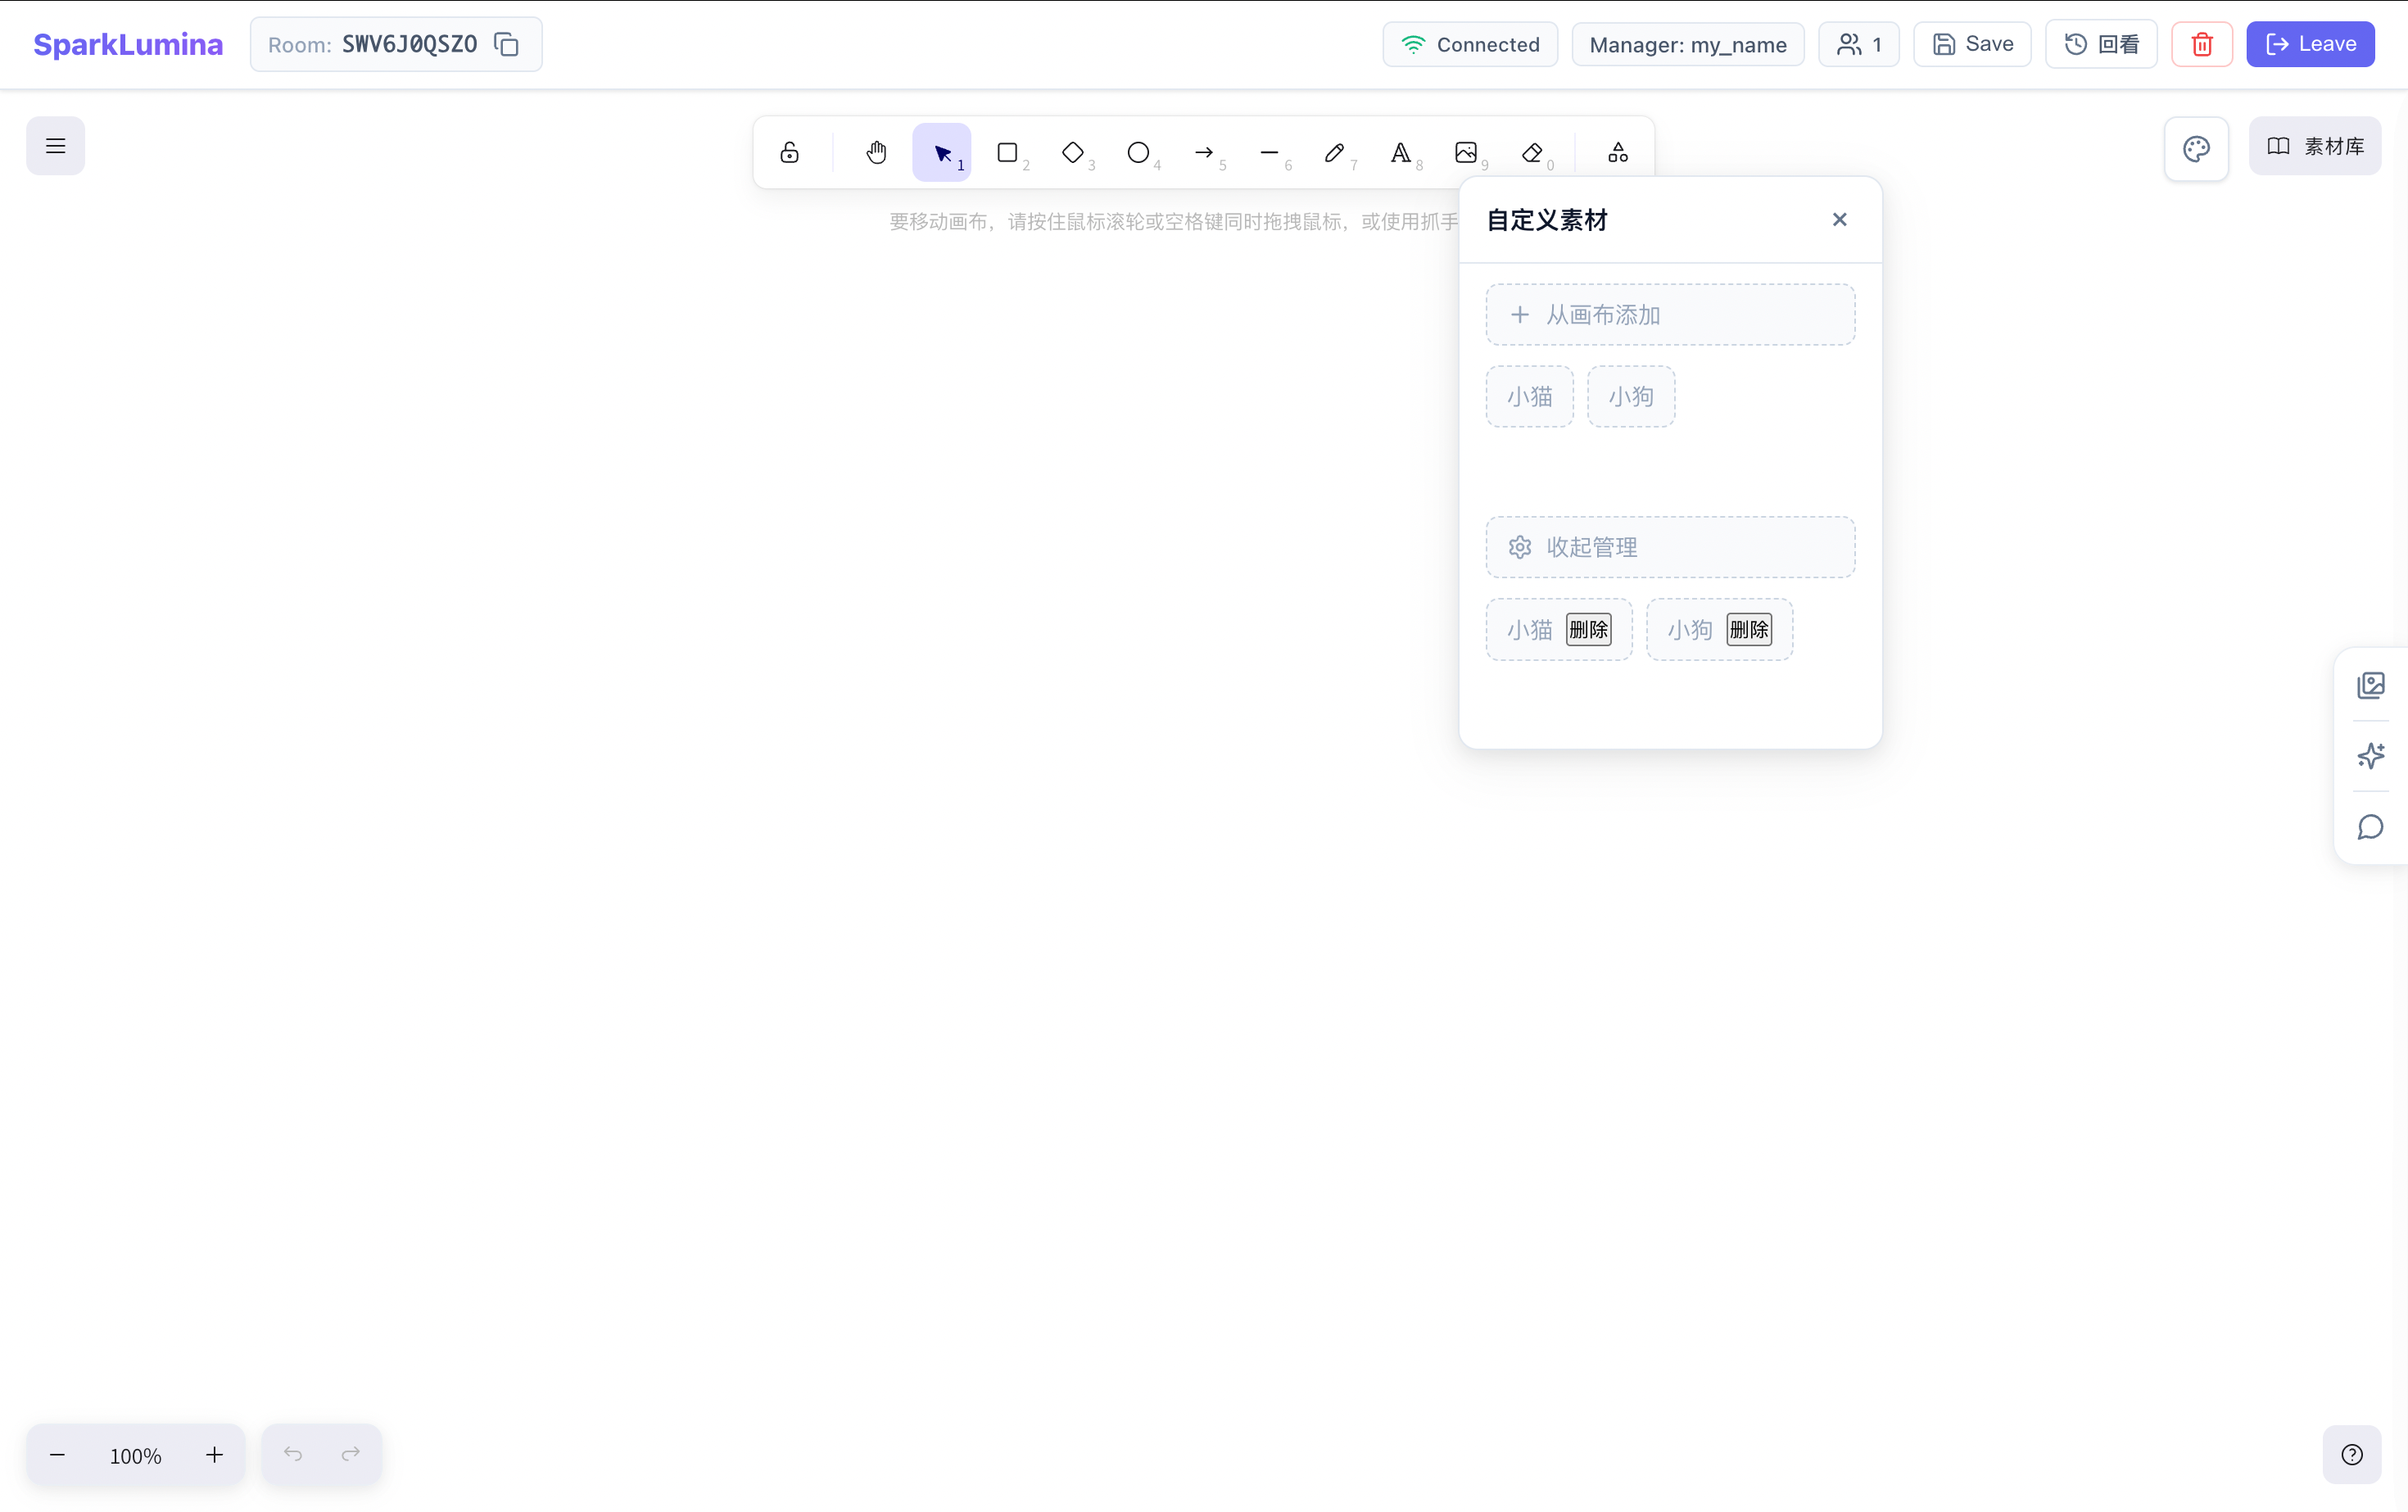
4.4 Custom Library
Click the 🎨 (Palette) button in the top-right of the canvas to open the custom library panel.
- Add: Select elements on the canvas, click "Add to custom library", enter name and description.
- Use: Click a library item to insert into the canvas.
- Manage: Rename or delete saved items.
- AI usage: Xchat ExAgent can reference your custom library for consistent style.
- Data is stored in
localStorage, per device.
5. Application Features
After entering a room, the right Dock (frosted glass vertical buttons) provides three AI feature entries; only one panel can be open at a time.
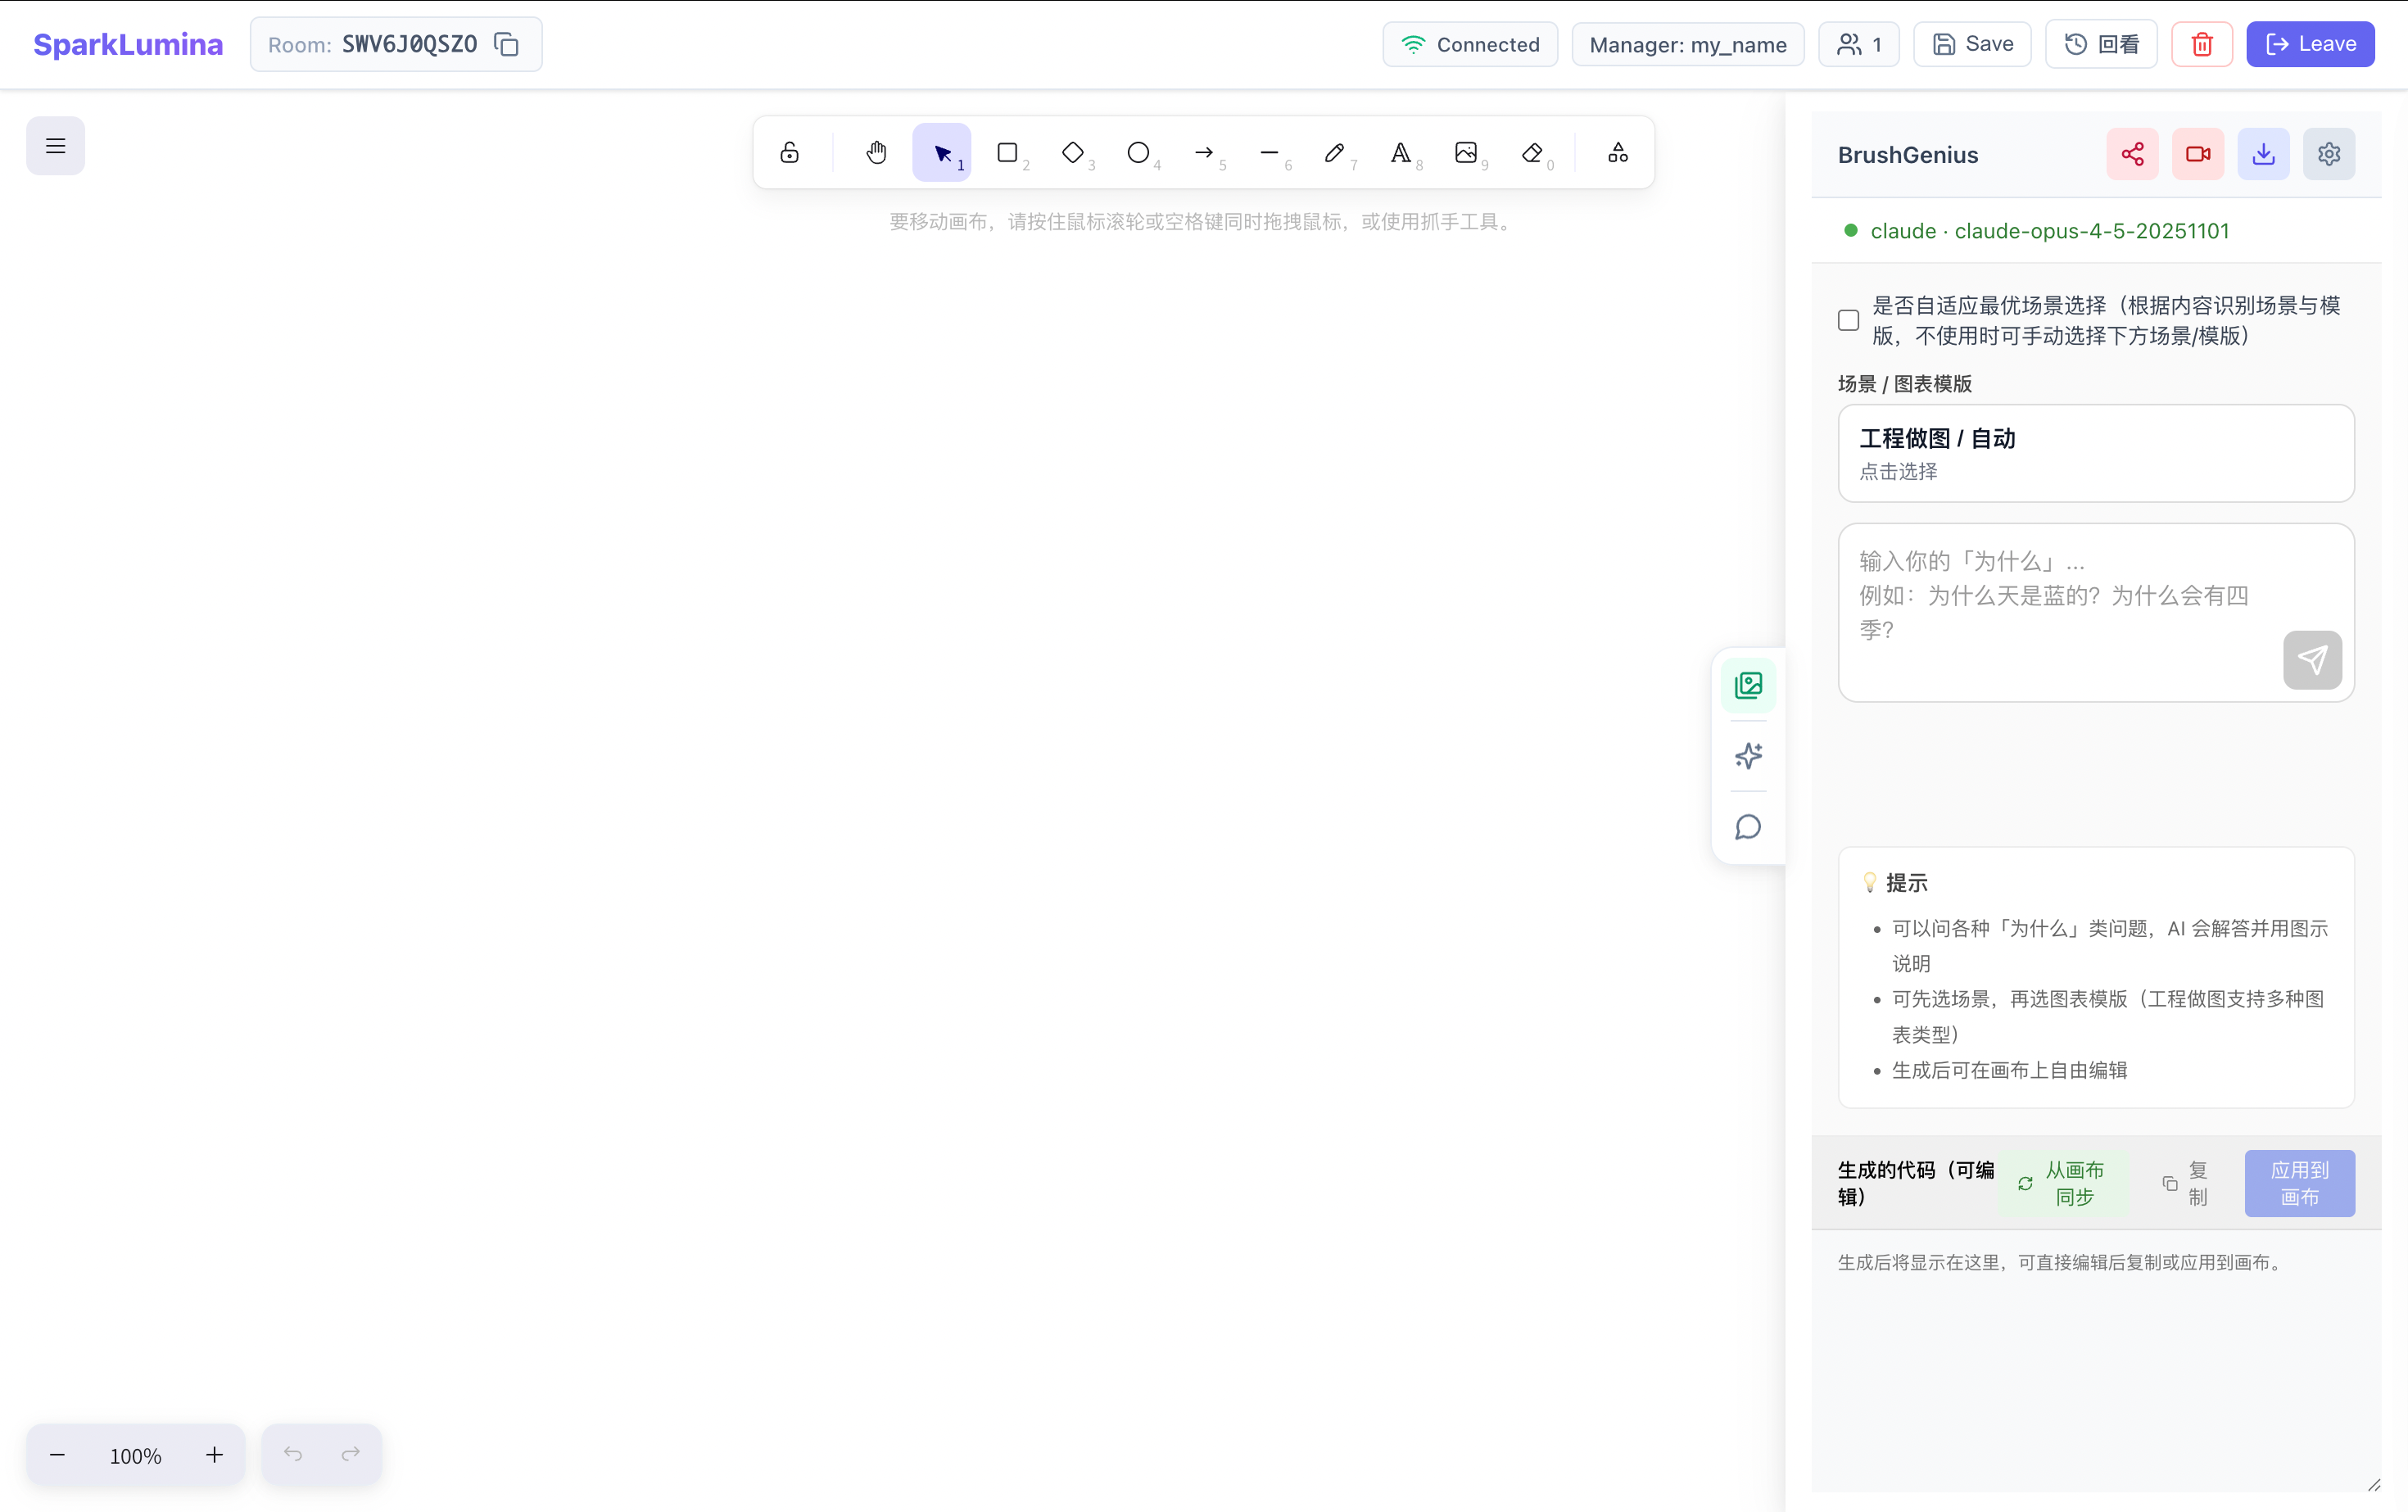
5.1 BrushGenius
BrushGenius is an AI drawing assistant that generates structured Excalidraw diagrams from natural language, with audio-visual sync and video recording.
Top Action Bar
| Button | Function |
|---|---|
| 🔗 Share | Share canvas screenshot or recorded MP4 to social / copy link |
| 🎥 Record | Start / stop recording canvas + TTS audio as MP4 |
| ⬇️ Download | Export canvas (PNG / SVG / Excalidraw / MP4) |
| ⚙️ Config | Configure LLM (API Key, Base URL, model, etc.) |
Scene & Chart Templates
- Adaptive best scene: When checked, AI auto-selects the best scene and template from input.
- Manual: Uncheck to manually choose in the Scene / Chart template selector:
| Scene | Templates |
|---|---|
| Engineering | Flowchart, mind map, org chart, sequence, UML, ER, Gantt, timeline, tree, network topology, architecture, data flow, state, swimlane, concept, fishbone, SWOT, pyramid, funnel, Venn, matrix, infographic, auto (23 types) |
| Journal | Default |
| Notion Notes | Default |
| Soul Artist | Default |
| Teacher Classroom | Default |

Generation Flow
- Enter a "why" question or drawing request in the input, then send.
- AI streams Excalidraw skeleton JSON with live preview.
- After generation, the "Generated code (editable)" area shows the full JSON.
- Click Apply to canvas to insert; Sync from canvas to backfill from canvas; Copy to copy to clipboard.
Audio-visual sync: With recording on, each generated element appears in script order with TTS narration for a "draw while speaking" demo.

Export & Share
- Export PNG — Current canvas screenshot
- Export SVG — Vector format for documents
- Export Excalidraw —
.excalidrawsource file - Export MP4 — Full video with audio-visual demo
- Share — Upload to server for shareable link, or publish to Xiaohongshu

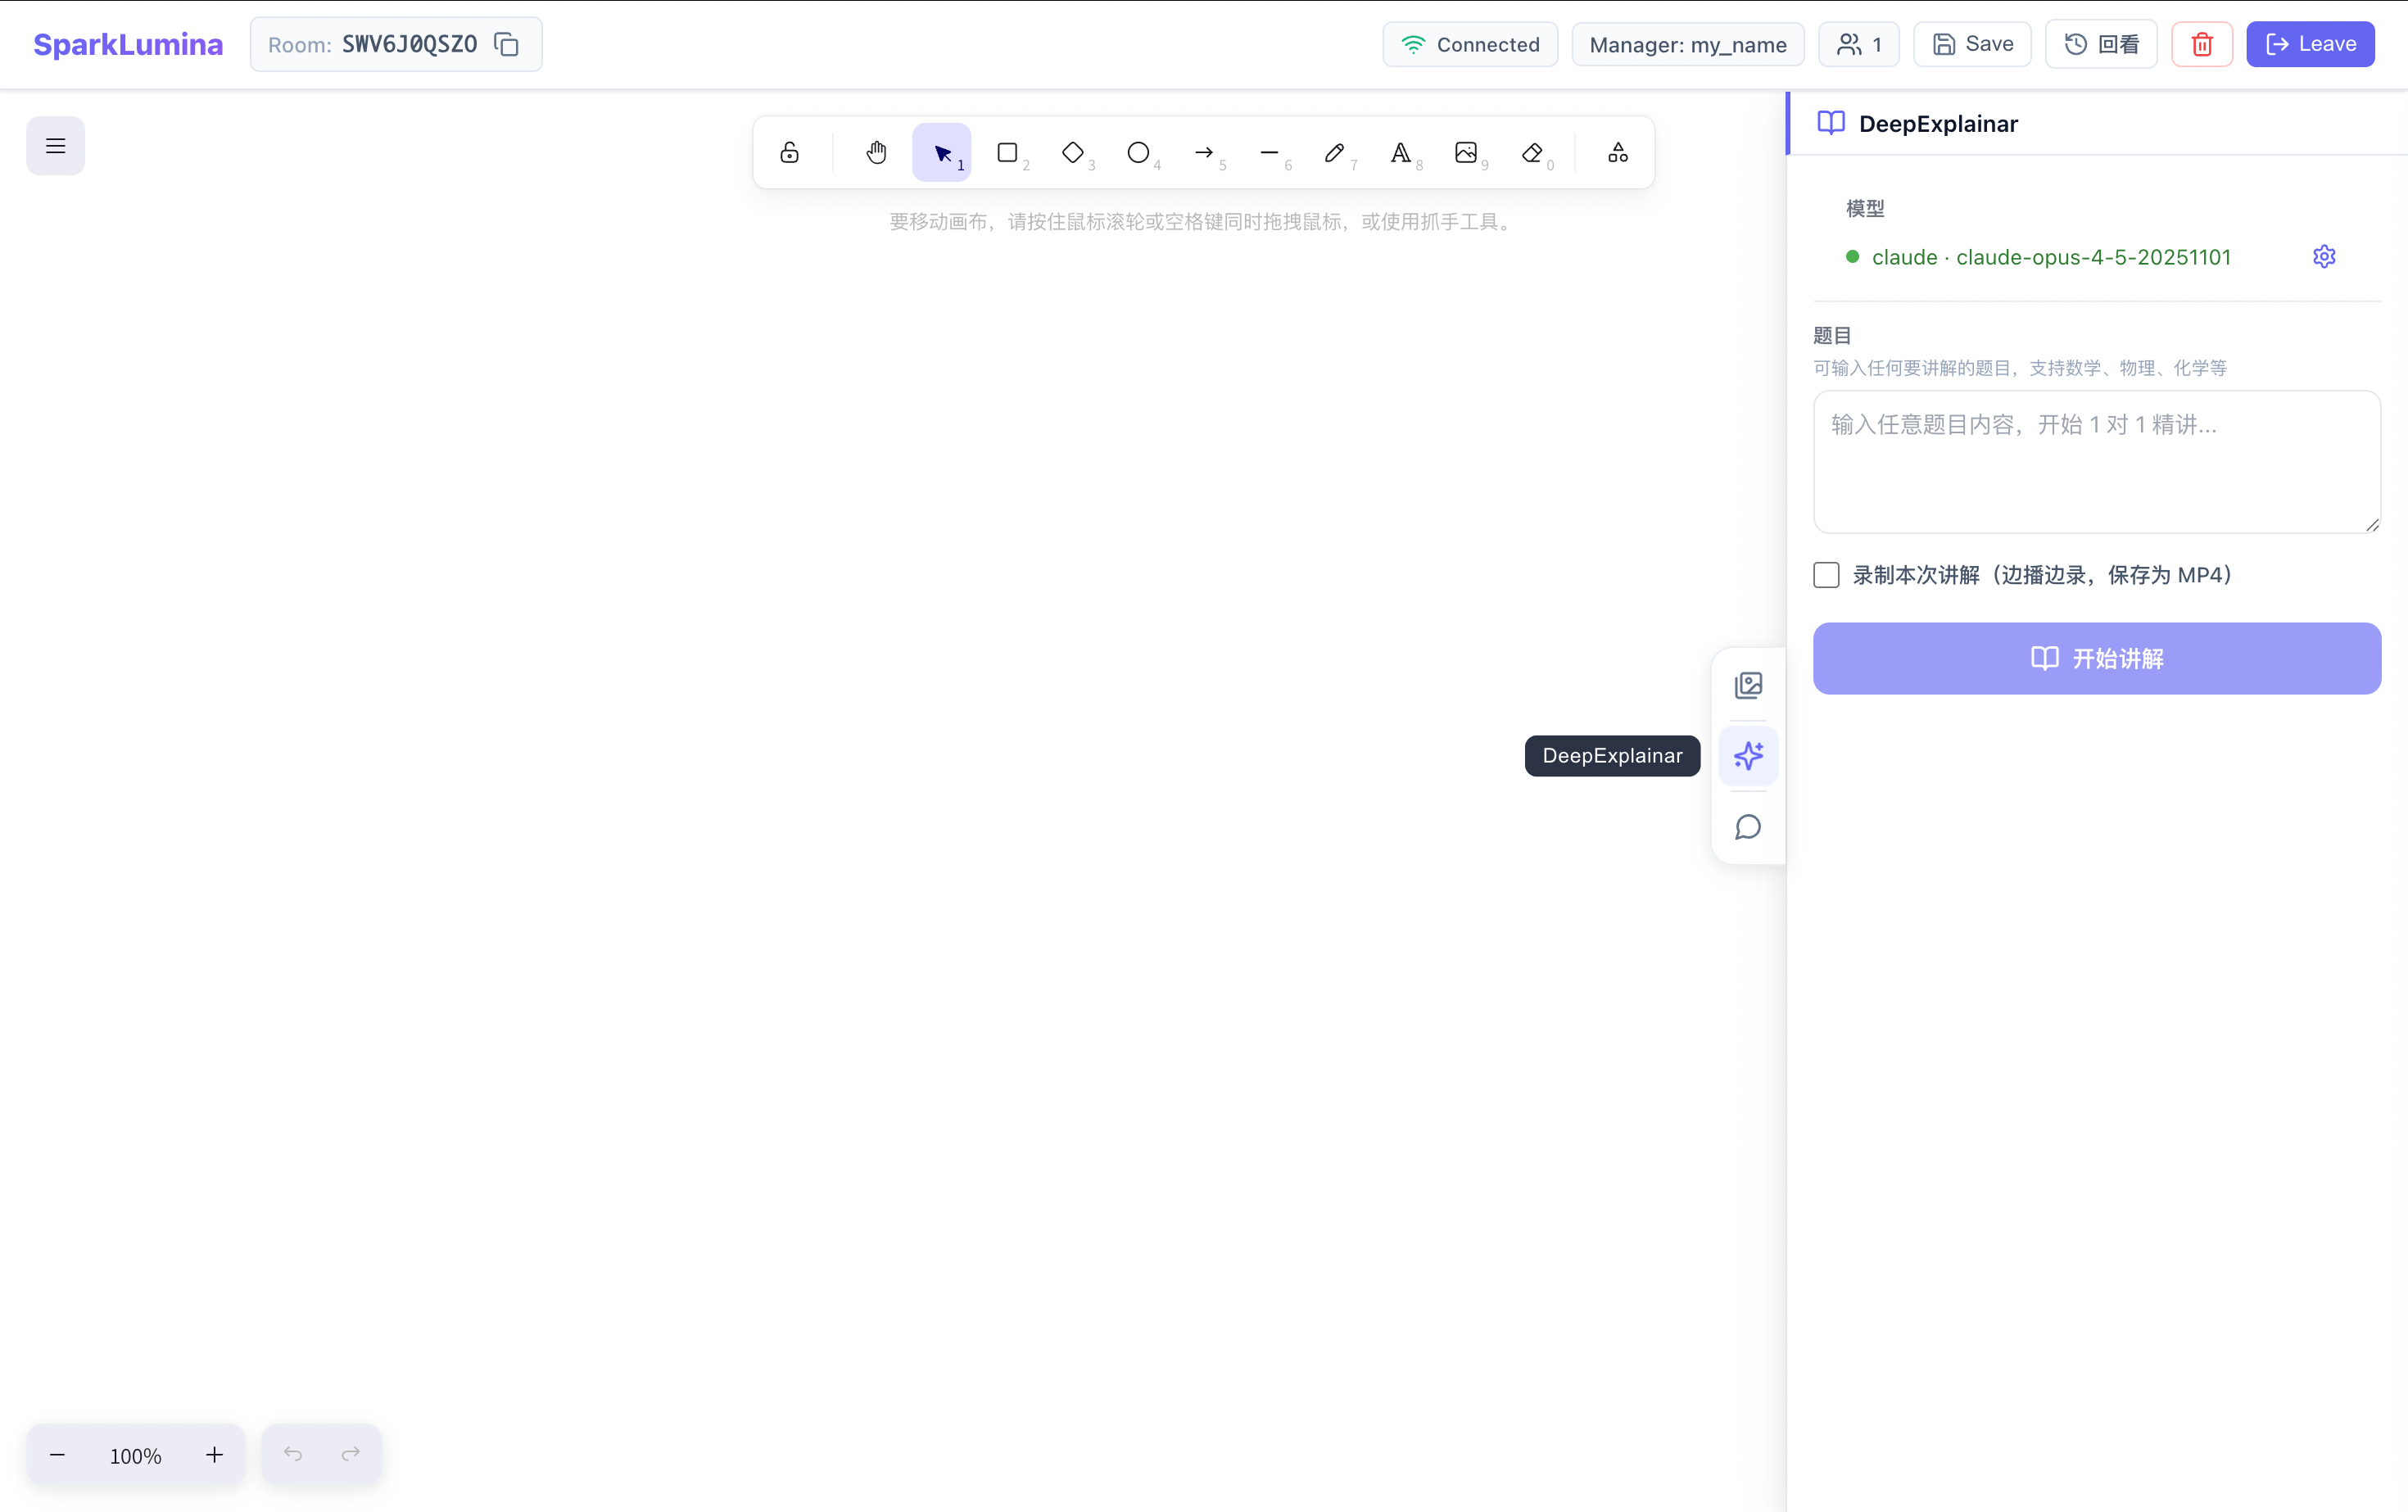
5.2 DeepExplainar
DeepExplainar is an AI problem-solving assistant. Enter any problem, and AI explains step-by-step while drawing on the whiteboard and reading aloud with TTS.

Usage Flow
- Configure model: Click ⚙️ to set LLM (API Key, model, Base URL). Active config is shown at the top (green dot + model name).
- Enter problem: Fill in the problem in the input; supports math, physics, chemistry, etc.
- Optional recording: Check "Record this lecture (save as MP4)" to save the full video with audio.
- Start: Click Start lecture; AI streams the explanation.
Playback
- Content is shown as multiple Steps with text and Excalidraw diagrams.
- Left area renders Markdown; right area renders Excalidraw.
- TTS reads each step; text and graphics sync.
- Controls: Previous / Next, Pause / Resume, jump to any step.

Interactive Q&A
During or after the lecture, you can ask follow-up questions in the input ("Ask the teacher"); AI answers in conversation form.
Share & Export
- Export MP4 with board content + diagrams + audio.
- Generate share link or publish to Xiaohongshu.
5.3 Xchat
Xchat is a canvas Agent assistant. Chat with AI in natural language; the Agent creates, edits, and deletes shapes on the whiteboard for a "speak to draw" experience.

Core Capabilities
| Capability | Description |
|---|---|
| Create shapes | Generate rectangles, ellipses, text, arrows, sticky notes, freehand at specified positions |
| Edit shapes | Update color, text, position, size, etc. |
| Delete shapes | Remove specified shapes or clear batch |
| Navigate viewport | Agent moves viewport to the action area |
| Todo list | Agent maintains task progress at the bottom |
| Library usage | Use built-in and custom library shapes |
Context Selection
Xchat supports attaching selected elements or box-selected area as context:
- Selected elements: Select one or more elements on the canvas, then send a message; the bubble shows the selection type (e.g.
Selection · Ellipse); Agent uses it as the target. - Area: Click Area next to the input, drag a rectangle on the canvas; a screenshot is attached; Agent can perceive the content.
- Add Context: Manually pick elements from the canvas list.

Todo List
For complex multi-step tasks, the Agent maintains a live todo list at the bottom:
- Click to expand subtasks.
- Subtasks are marked complete automatically.
- User can intervene; Agent re-evaluates and updates the plan.

Top Action Bar
| Button | Function |
|---|---|
| 🔗 Share | Share canvas screenshot or recorded video |
| 🎥 Record | Start / stop recording Agent demo (with TTS) |
| ⬇️ Download | Export canvas (PNG / SVG / Excalidraw) |
| ⚙️ Config | Configure LLM |
First-time tip: Configure LLM via ⚙️ and ensure the AI Agent service (port 8652) is running before using Xchat.
6. LLM & TTS Configuration
LLM config is shared by BrushGenius, DeepExplainar, and Xchat. Config is stored in local localStorage only, not uploaded.
6.1 Config Entry
The ⚙️ button on any AI panel opens the config dialog. The title may vary (AI Teaching · LLM Config / AI Assets · LLM Config), but the same config is edited.
- Config list: Shows all saved configs; click to set as active (green dot).
- Multiple configs: Save multiple (e.g. internal Flybird + personal Anthropic) and switch as needed.
- Actions: Edit (✏️) or delete (🗑️) each config.
6.2 LLM Provider & Basic Config
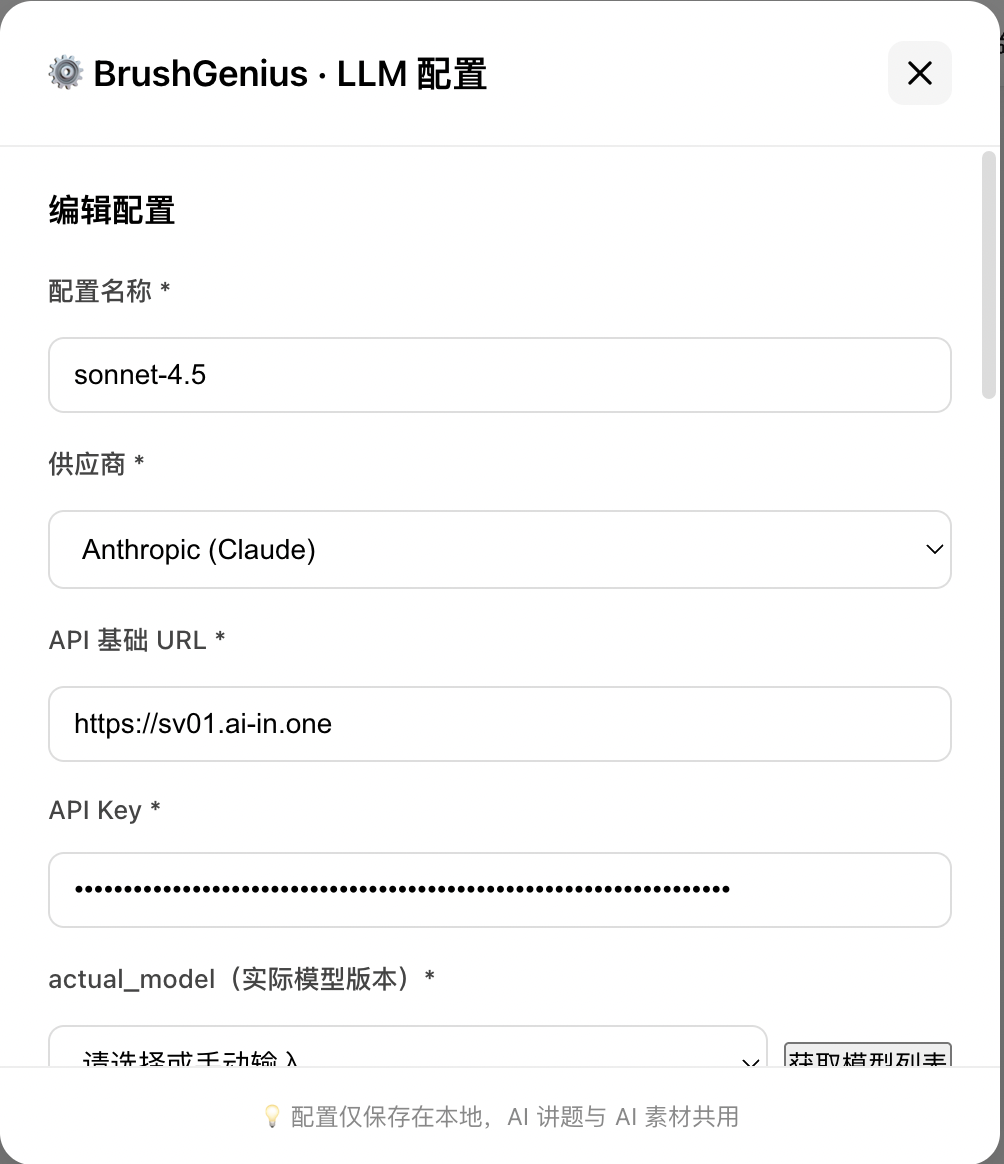
Click "Add config" or edit existing to fill:
| Field | Description |
|---|---|
| Config name | Custom label, e.g. "Doubao 1.8", "Claude Sonnet 4.5" |
| Provider | Select from dropdown (see table below) |
| API Base URL | Server URL; default filled by provider, can override |
| API Key | Auth key (password input) |
Supported providers and default Base URLs:
| Provider | ID | Default Base URL |
|---|---|---|
| OpenAI | openai | https://api.openai.com/v1 |
| Anthropic (Claude) | anthropic | https://api.anthropic.com/v1 |
| Doubao | doubao | https://ark.cn-beijing.volces.com/api/v3 |
| Alibaba Qianwen | qianwen | https://dashscope.aliyuncs.com/compatible-mode/v1 |
| Kimi | kimi | https://api.moonshot.cn/v1 |
| MiniMax | minimax | https://api.minimax.io/v1 |
| Flybird (Doubao) | flybird | Internal URL (auto-filled) |
Base URL supports any OpenAI-compatible proxy for flexible model integration.
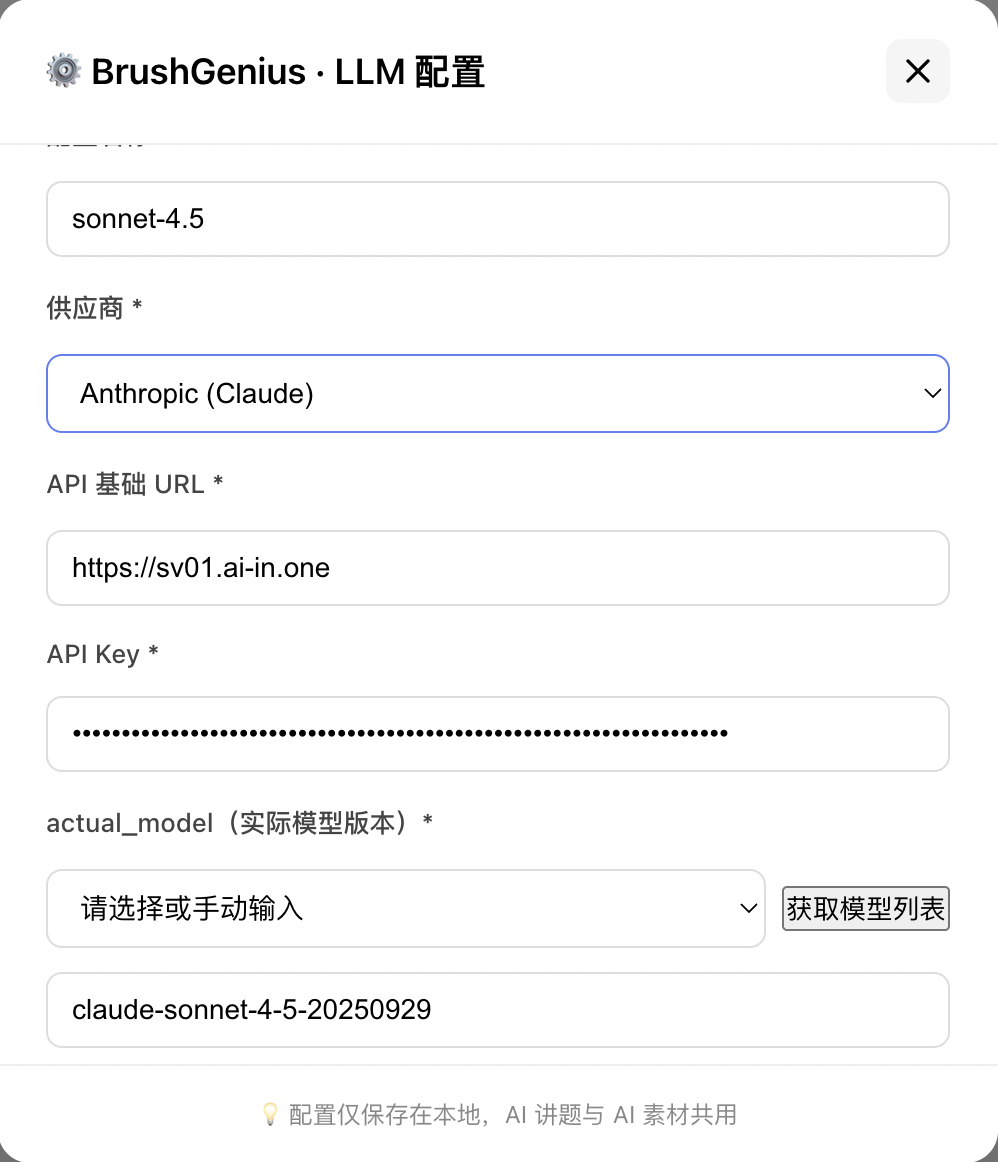
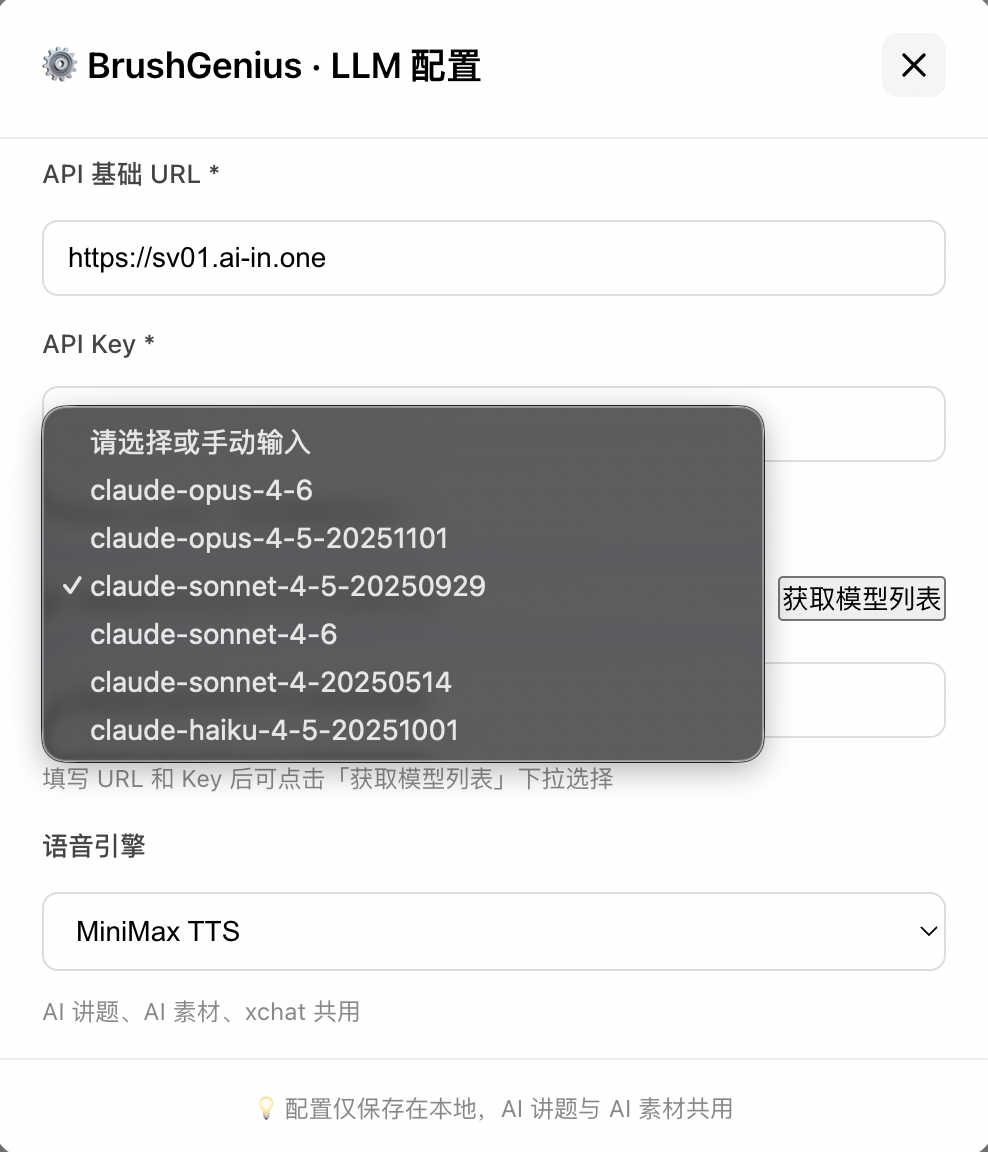
6.3 Model Selection
Field: actual_model (model version)
- Flybird: Enter model version manually (default
doubao-seed-1-8-251228). - OpenAI / Anthropic: After filling URL and Key, click "Fetch model list" to load available models; or type manually (e.g.
gpt-4o,claude-sonnet-4-5). - Others: Enter model name manually.
6.4 TTS Engine Config
DeepExplainar and BrushGenius audio-visual sync rely on TTS. Two engines are supported:
CustomBridge (default)
| Field | Description |
|---|---|
| Voice engine | Select CustomBridge |
| CustomBridge URL | TTS bridge URL; leave empty to use server TTS_BRIDGE_URL |
For self-hosted or internal TTS.
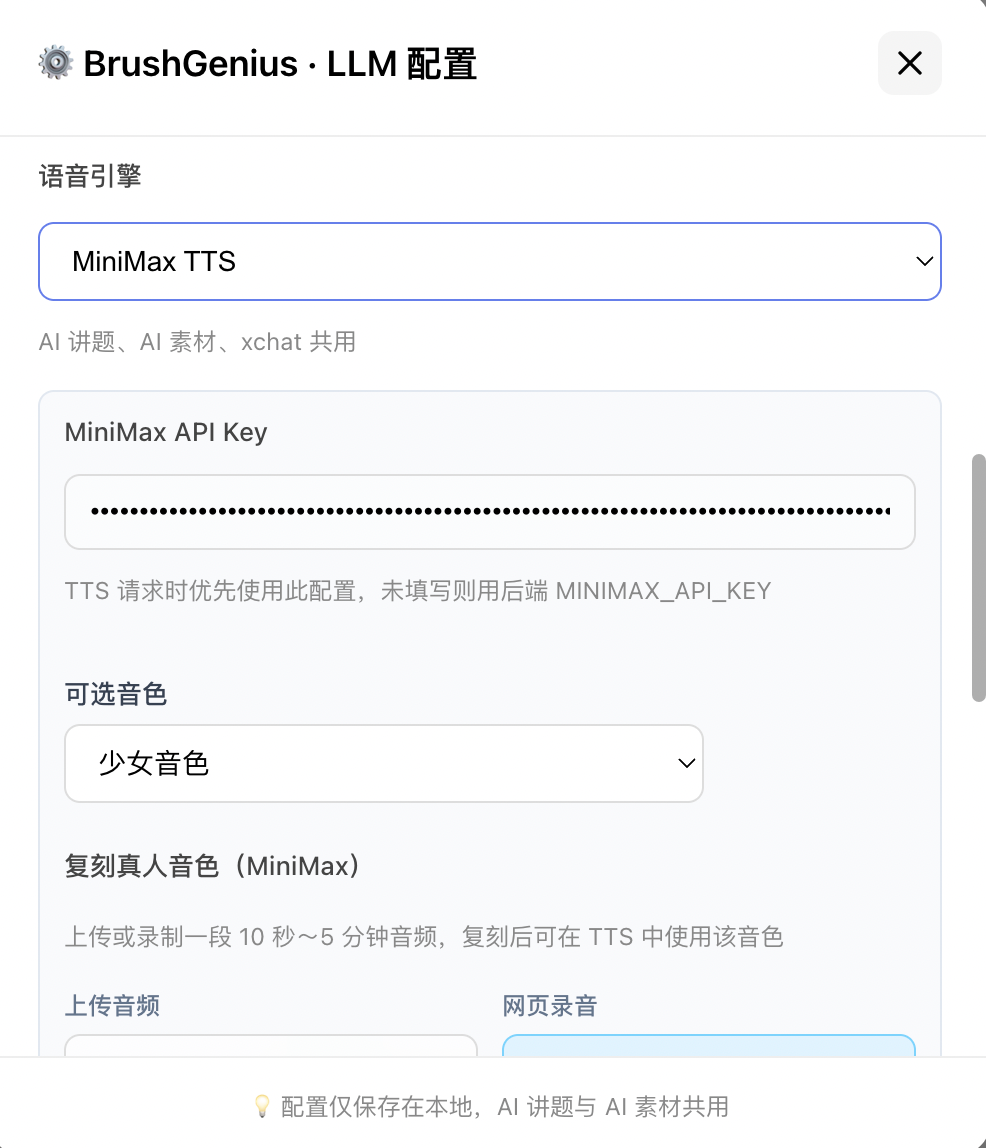
MiniMax TTS
| Field | Description |
|---|---|
| Voice engine | Select MiniMax TTS |
| MiniMax API Key | Optional; overrides server MINIMAX_API_KEY |
| Voice | Select built-in or cloned voice (grouped by language) |
Voice cloning is available when MiniMax TTS is selected (see next section).

6.5 Custom TTS Voice (MiniMax Voice Cloning)
When MiniMax TTS is selected, the "Clone real voice" section appears at the bottom.
Cloning Steps
-
Provide audio (choose one):
- Upload file: mp3 / mp4 / m4a / wav, etc.
- Web recording: Click "🎙️ Start recording", use mic, then "⏹️ Stop recording" to upload.
- Duration: 10 seconds to 5 minutes; clearer and cleaner audio works better.
-
Fill cloning params (after upload):
| Field | Description | Requirement |
|---|---|---|
| Custom voice ID | Unique ID for the cloned voice | 8–256 chars, first char must be letter |
| Voice name (optional) | Display name in list | Any string |
| Language group (optional) | Group in dropdown | Chinese (Mandarin) / Chinese (Cantonese) |
-
Click "Start cloning": MiniMax speech-2.8-turbo runs; new voice ID is filled into the config.
-
Done: Config shows "Current cloned voice ID:
xxx, ready"; save to apply.
Cloned voices are stored in your MiniMax account and remain available.
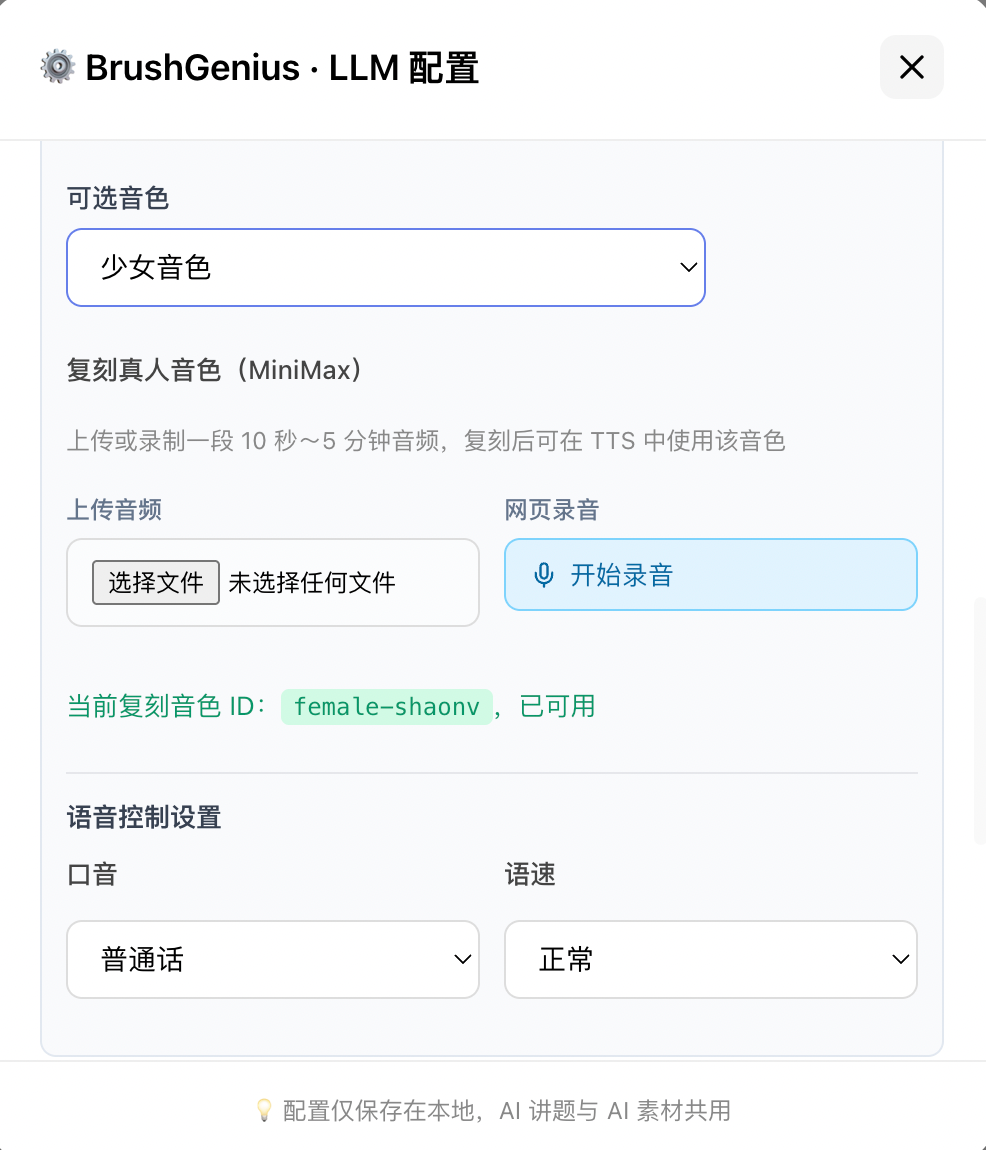
6.6 Voice Control
When MiniMax TTS is used:
| Param | Options | Description |
|---|---|---|
| Accent (language_boost) | Mandarin / Cantonese / English / Auto | TTS accent |
| Speed (speed) | Very slow / Slow / Normal / Fast / Very fast | Maps to 2 / 3 / 5 / 7 / 9 internally |
6.7 Advanced LLM Params
Three groups of advanced params at the bottom:
| Group | Fields | Use case | Default |
|---|---|---|---|
| Main generation | temperature / top_p | Lecture, AI assets | 0.8 / 0.75 |
| Interactive Q&A | interaction_temperature / interaction_top_p | DeepExplainar follow-up answers | 0.8 / 0.75 |
| Classification | classification_temperature / classification_top_p | Problem classification, JSON fix | 0.1 / 0.9 |
temperature: Higher = more random, lower = more deterministic. Range 0–2.top_p: Nucleus sampling. Range 0–1.- Classification tasks: use low temperature (e.g. 0.1) for stability.
All params optional; backend uses defaults when empty.

Last updated: 2026-03-06